
The Best Way to Store Fresh Herbs for Lasting Flavor
You know the story. You grab a beautiful bunch of fresh cilantro for taco night, use a handful, and a few days later, you’re greeted by a slimy, wilted mess in your fridge. It feels like throwing money straight into the compost bin, but it’s a problem with a surprisingly simple solution.
The key is to remember that fresh herbs are still living plants. Once they're cut, they're on the clock, losing moisture and flavor with every passing hour.
Why Your Fresh Herbs Don't Last
It’s not your fault your herbs are dying a quick death in the crisper drawer. The cold, dry air inside a typical refrigerator is designed to prevent spoilage, but for delicate herbs, it’s a recipe for disaster. That environment actively sucks the life-giving moisture right out of their leaves, causing them to wilt and fade.
But it’s not just about looks. The real tragedy is the loss of flavor.
The Science Behind Sad, Flavorless Herbs
That incredible aroma and taste you love? It comes from volatile oils inside the herb's leaves. When herbs get dehydrated or are stored at the wrong temperature, these oils literally evaporate into thin air.
The statistics are pretty shocking. Research shows that a staggering 68% of flavor loss in fresh herbs is a direct result of poor storage. Some herbs can lose about 30% of their essential oils in the first 48 hours alone. Tossing them unprotected into a fridge drawer can lead to spoilage rates as high as 83%. If you're interested in the details, this study on herb and spice flavor secrets breaks it down further.
This is exactly why a one-size-fits-all approach just doesn't work.
Tender vs. Hardy: The Two Types of Herbs
You wouldn't treat a head of lettuce the same as a potato, and the same logic applies here. Fresh herbs fall into two distinct camps, and knowing which is which makes all the difference.
-
Tender Herbs: Think soft stems and delicate leaves. This group includes cilantro, parsley, basil, mint, and dill. They are incredibly thirsty and need a constant source of water to stay perky.
-
Hardy Herbs: These have woody stems and more rugged leaves. We're talking about rosemary, thyme, sage, and oregano. They hold onto moisture better but can get moldy if they’re too damp.
Once you nail this distinction, you're on your way to keeping herbs fresh for weeks, not days. These same principles of managing moisture and temperature apply to other fresh items, too. For example, our guide on how to properly store cut ginger root uses similar techniques. By matching your storage method to the herb, you’ll cut down on waste and make sure every dish pops with the vibrant flavor you paid for.
Fridge Storage: Your First Line of Defense for Fresh Herbs
The refrigerator is your best friend when it comes to keeping herbs from wilting, but there’s a right way and a wrong way to do it. Just tossing that bunch of cilantro into the crisper drawer is a surefire way to end up with green sludge in a few days. The real trick is knowing that not all herbs are created equal.
We’re going to cover the two most effective fridge-storage techniques I use in my own kitchen. One is for the delicate, leafy herbs, and the other is for their tougher, woodier cousins. Get these two methods down, and you’ll instantly level up your herb game.
Keeping Tender Herbs Happy: The Bouquet Method
Think of your tender herbs—parsley, cilantro, dill, and mint—like a little bouquet of flowers. Their soft stems and delicate leaves are thirsty and will wilt fast if left on their own. To keep them perky and vibrant, you need to give them a constant drink of water.
This is where the Bouquet Method comes in, and it's a lifesaver. This simple trick can easily take your herbs from lasting a couple of sad days to a solid week, sometimes even two.
Here’s exactly how I do it:
- Give the stems a trim. Snip about half an inch off the bottom, just like you would with flowers. A fresh cut helps them drink up water much more efficiently.
- Find a jar and add water. Grab a glass jar or even just a sturdy cup. You only need about an inch of cool water at the bottom.
- Arrange your herb bouquet. Place the trimmed herbs in the jar, making sure the stems are submerged. A key detail: try to keep the leaves out of the water to prevent them from getting slimy and rotting.
- Give them a little cover. Loosely drape a plastic bag (like the one you got them in at the store) over the leaves. This creates a mini-greenhouse, keeping the humidity just right. Don't seal it up tight! They still need to breathe.
Pop the whole setup in your fridge. I make it a habit to change the water every couple of days to keep things fresh and stop any funk from growing.
This decision tree visualizes that first critical choice you have to make.
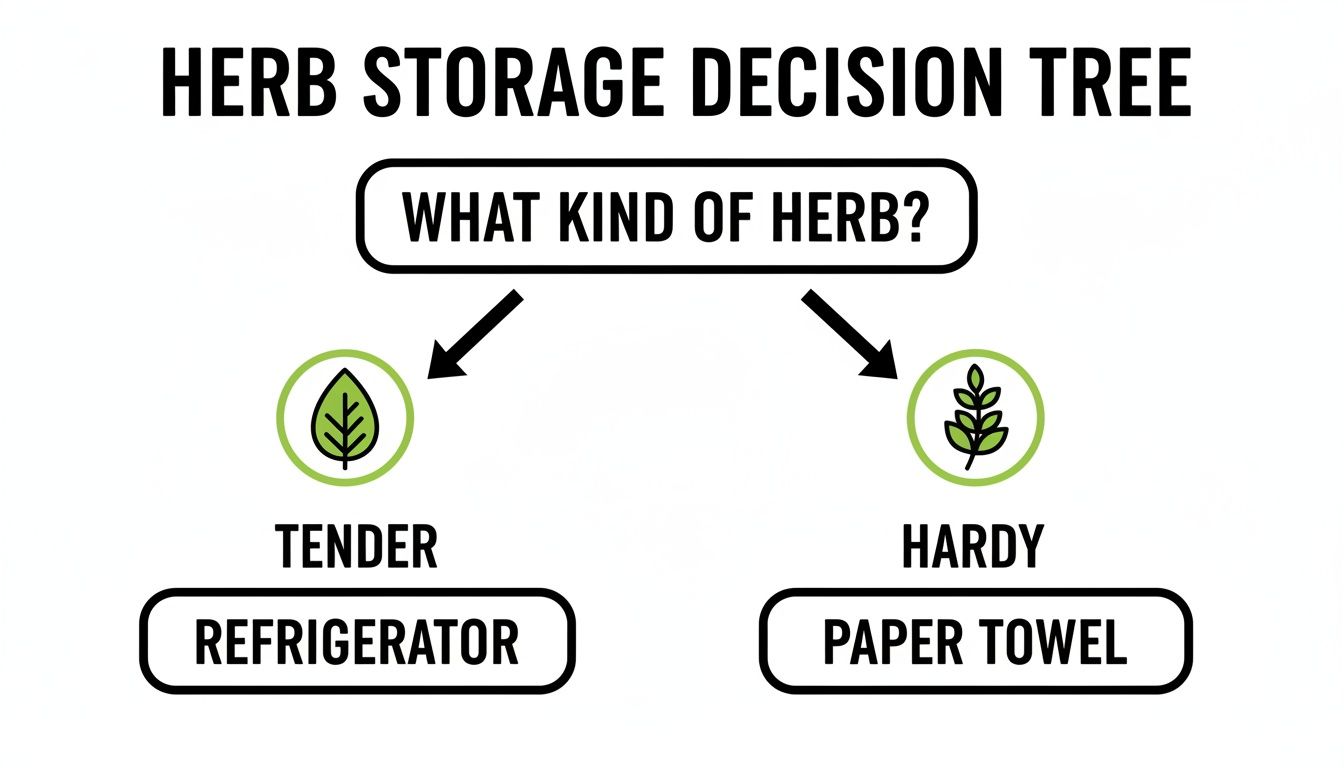
As you can see, figuring out if an herb is tender or hardy is the first step. Once you know that, the rest is easy.
Protecting Hardy Herbs: The Damp Towel Method
Hardy herbs like rosemary, thyme, sage, and oregano play by a different set of rules. Their woody stems and tougher leaves don't lose moisture as quickly, but they are prone to getting musty or moldy if they're too wet. For these guys, the goal is to provide a bit of humidity, not a bath.
The Damp Towel Method strikes that perfect balance. It stops them from drying out in the cold, circulating air of the fridge without creating a swampy mess.
It couldn't be simpler:
- Moisten a paper towel. Get a paper towel slightly damp—not dripping wet. If you can squeeze water out of it, it’s too wet.
- Wrap the herbs. Gently roll the bunch of herbs up in the damp towel, creating a protective, humid little bundle.
- Tuck them away. Slide the wrapped herbs into a reusable zip-top bag, a beeswax wrap, or any airtight container. I usually just put them right in the crisper drawer.
With this little bit of effort, your rosemary and thyme will stay fragrant and ready to go for up to two weeks.
My #1 Tip: Hold off on washing your herbs until you're ready to use them. Rinsing them beforehand adds extra moisture that invites spoilage, no matter how well you store them. A quick rinse and pat dry just before chopping is all they need.
To make it even easier, here's a quick cheat sheet for some of the most common herbs you'll bring home.
Quick Guide to Storing Common Fresh Herbs
This table breaks down which method works best for the herbs you're most likely to buy. It's a handy reference to keep in mind on grocery day.
| Herb | Herb Type | Best Refrigerator Method | Estimated Shelf Life |
|---|---|---|---|
| Parsley | Tender | Bouquet in a Jar | 1-2 Weeks |
| Cilantro | Tender | Bouquet in a Jar | 1-2 Weeks |
| Mint | Tender | Bouquet in a Jar | 1-2 Weeks |
| Dill | Tender | Bouquet in a Jar | 1 Week |
| Basil | Tender | Bouquet (on counter) | 5-7 Days |
| Rosemary | Hardy | Damp Towel Wrap | 2-3 Weeks |
| Thyme | Hardy | Damp Towel Wrap | 2 Weeks |
| Sage | Hardy | Damp Towel Wrap | 1-2 Weeks |
| Oregano | Hardy | Damp Towel Wrap | 1-2 Weeks |
This simple chart is a great starting point. After a while, you’ll get a natural feel for what each herb needs to stay at its peak.
Why Your Fridge's Temperature Really Matters
You can have the perfect technique, but temperature is the other half of the equation. Most home refrigerators are set a bit warmer than what’s truly ideal for herb longevity. Research shows that the sweet spot for most herbs is right at 0°C (32°F), which can keep them fresh for about three weeks. At a more typical 5°C (41°F), that lifespan drops to around two weeks.
Take parsley, for instance. It can last an incredible 21 to 36 additional days at 0°C compared to just three days on the counter. The one major outlier is basil—it hates the cold and its leaves will turn black. Keep it above 10°C (50°F). For a deeper dive, you can read more about the impact of temperature on herb storage and see just how much of a difference a few degrees can make.
A Smart Upgrade: Dedicated Herb Keepers
If you're like me and always have fresh herbs on hand, you might want to consider investing in a dedicated herb keeper. These are basically purpose-built containers that perfect the bouquet method. They have a little water well at the bottom and a clear shell that keeps humidity levels perfect. They’re also much less likely to tip over in the fridge than a repurposed jam jar, which is a definite plus.
So, you’ve got a mountain of herbs from the garden or couldn't resist that huge bunch at the farmer's market. Keeping them in the fridge is great for the next few days, but what about the long haul? This is where you can lock in that incredible summer flavor to enjoy months down the road. Let's move beyond the refrigerator and talk about the two best ways to preserve your bounty: freezing and drying.
Each method has its place. Knowing which one to use for which herb—and for what kind of dish—is the key to making sure none of that beautiful flavor goes to waste.
Freezing: The Best Way to Keep Herbs Tasting Fresh
If you want to capture that just-picked character, freezing is your best bet. It’s perfect for herbs you plan to use in cooked dishes, where their bright flavor can really shine. While super delicate herbs like mint and dill don't hold up well to freezing whole, the tougher, woodier ones—rosemary, sage, thyme, oregano—are fantastic candidates.
But there’s more than one way to freeze an herb. The right approach really depends on how you see yourself using it later.
One Quick Prep Tip: Before you freeze anything, wash and completely dry your herbs. A salad spinner is your best friend here. Any leftover water turns into ice crystals, which leads to freezer burn and a serious loss of flavor.
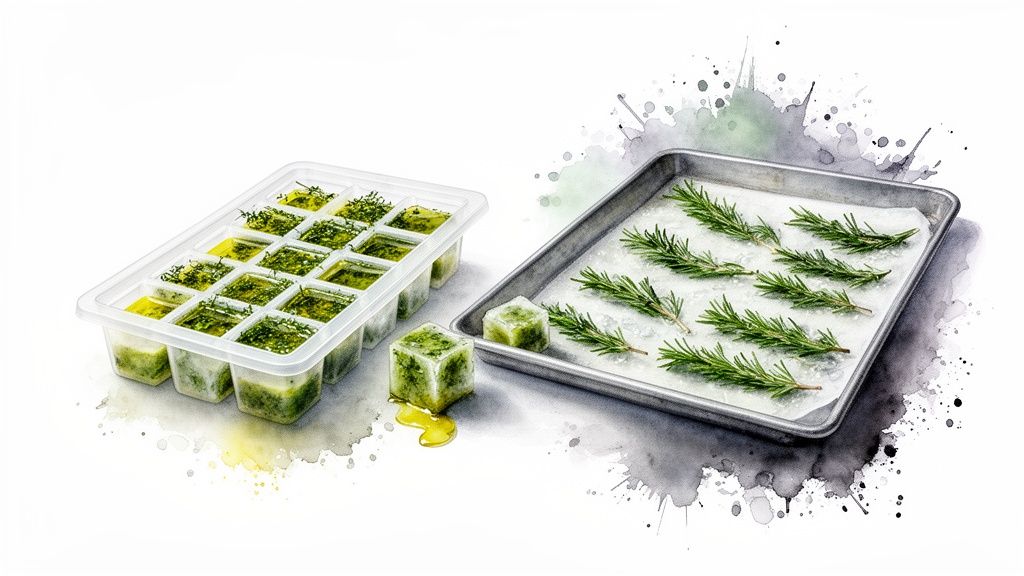
For whole sprigs of rosemary or thyme, I love the flash-freeze method. Just lay the clean, dry sprigs on a baking sheet in a single layer and pop them in the freezer for an hour or two. Once they're solid, you can toss them all into a freezer bag. This way, they won't freeze into one giant clump, and you can easily grab just a sprig or two when you need them.
The Ice Cube Tray Method: A True Game-Changer
This is one of my all-time favorite kitchen hacks. Creating little "flavor bombs" in ice cube trays is incredibly practical, especially for chopped herbs like parsley, chives, and oregano. This is also how you can get around the "don't freeze basil" rule—when it's suspended in oil, it works beautifully.
Here’s how you can make your own:
- Chop them up: Finely chop your clean, dry herbs. You can stick to one type or get creative with blends. A classic mix for roasts is rosemary, sage, and thyme.
- Fill the tray: Pack about one tablespoon of the chopped herbs into each cube section.
- Add your liquid: Top off the herbs with olive oil, melted butter, or even just water or broth. Olive oil is my go-to, as it does a fantastic job of preserving flavor and is the perfect starter for a sauce or sauté.
- Freeze it solid: Cover the tray and slide it into the freezer until the cubes are completely frozen.
- Bag them up: Once frozen, pop the cubes out of the tray and transfer them to a labeled freezer bag. They'll taste their best for 3-6 months.
The beauty here is the sheer convenience. Tossing one of these into a pan is the perfect way to start a soup or sauce. They’re a fantastic shortcut to a delicious meal, like in this fresh zucchini pasta recipe that uses frozen pesto cubes to whip up an amazing sauce in just minutes.
The Art of Drying Herbs
Drying is a classic for a reason. It concentrates the flavor of the herbs, giving them a deeper, more mellow and earthy profile. This is the method you want for herbs going into rubs, marinades, and dishes that simmer for a long time. It works best for hardy, low-moisture herbs like oregano, thyme, rosemary, and sage.
You’ve got a few options for drying:
- Air-Drying: This is the old-school, no-energy way. Tie small bundles of herbs with twine and hang them upside down in a spot that's warm, dry, and has good air circulation—but keep them out of direct sun. In a couple of weeks, the leaves will be brittle and ready for storage.
- Oven-Drying: If you're in a hurry or live somewhere humid, the oven is a great shortcut. Spread the herbs in a single layer on a baking sheet and set the oven to its lowest temperature. Crack the door open a bit to let the moisture escape. Check on them frequently; it usually takes a few hours.
- Dehydrator: For the most consistent results, a food dehydrator is the way to go. It uses low, steady heat and air to dry the herbs perfectly without cooking them, which helps preserve more of their essential oils than oven-drying.
When your herbs are completely dry—they should crumble easily in your fingers—store them in an airtight jar in a cool, dark cabinet. Done right, dried herbs can easily last for a year or more.
If you want to get really serious about preservation, you can look into things like using food grade hydrogen peroxide for produce to sanitize everything thoroughly before storage.
Ultimately, choosing between freezing and drying comes down to the herb you're working with and how you plan to use it. Freezing captures that fresh, vibrant kick, while drying gives you a deeper, more concentrated taste. Once you get the hang of both, you'll never let a good bunch of herbs go to waste again.
Your Essential Herb Preservation Toolkit
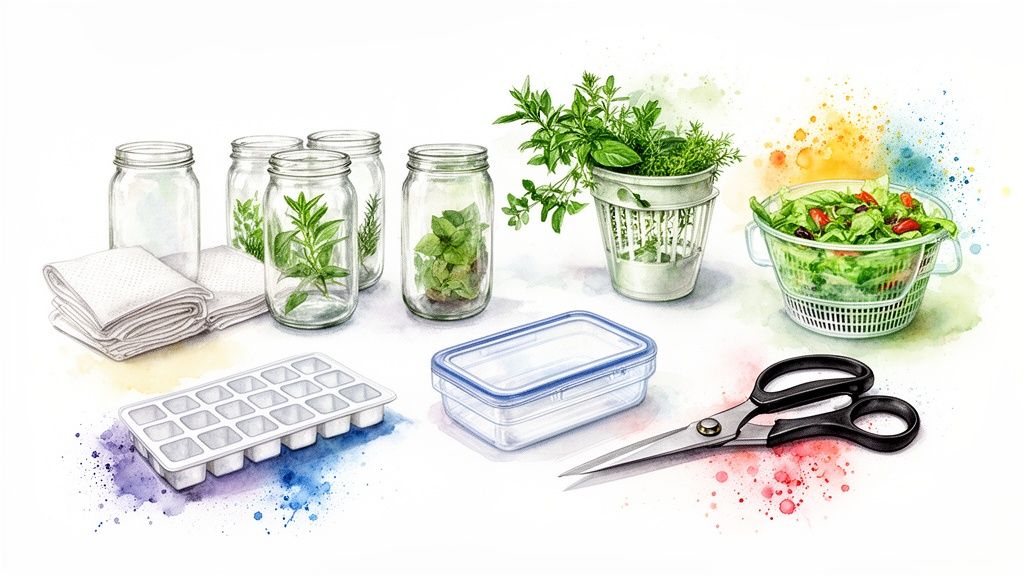
You don't need a professional kitchen to keep your herbs fresh, but having the right tools on hand makes a world of difference. It’s not just about preventing wilting; it's about locking in the volatile oils that give herbs their incredible flavor and aroma.
I like to think of it as setting up a little "herb preservation station." When you have your gear ready to go, you're much more likely to take the two minutes needed to prep your herbs when you get home from the store. That initial care is the single most important moment for their survival.
The Everyday Fridge Essentials
For keeping herbs vibrant for a week or two, a few simple items you probably already own will do the trick.
- Glass Jars or Mason Jars: These are my go-to for the "bouquet method." They’re sturdy, a breeze to clean, and you can see the water level at a glance, which is a great reminder to change it out. Honestly, a simple water glass works just fine, too.
- Paper Towels: Absolutely critical for the "damp towel method." They create the perfect humid environment for hardy herbs like rosemary and thyme, keeping them moist without getting them soggy.
- Reusable Bags or Plastic Bags: Loosely draping a bag over your jarred herbs creates a mini-greenhouse, trapping humidity right where you want it. Reusable silicone bags are a fantastic, eco-friendly option for your towel-wrapped bundles.
Game-Changing Kitchen Gadgets
If you're tired of limp cilantro, it might be time for an upgrade. These tools are a small investment but can make your herb storage practically foolproof.
A dedicated herb keeper is a real step up from a basic jar. These containers are built for this exact job, with a water reservoir at the bottom and a clear shell that protects delicate leaves from getting crushed in a packed fridge. They create a perfectly stable, high-humidity home for your herbs.
My other secret weapon? A mini salad spinner. I can't stress this enough: excess water is the enemy. It leads to mold and rot faster than anything else. A quick whirl in a spinner gets herbs so much drier than just patting them with a towel, which is especially important before freezing. Getting leaves properly dry means you avoid those flavor-killing ice crystals. We have a great guide explaining why a small salad spinner is so useful for tasks like this.
It sounds simple, but a sharp pair of kitchen shears makes a real difference. When you crush herb stems with a dull knife, you're damaging the very cells that absorb water. A clean snip keeps the stems healthy and ready to drink.
Tools for Long-Term Preservation
Got a huge bunch from the garden or farmers market? Let's get it prepped to last for months.
For freezing, silicone ice cube trays are brilliant for making those little olive oil and herb "flavor bombs." They're flexible, so the frozen cubes pop right out. To prevent freezer burn, you'll need quality, airtight freezer bags or containers—this part is non-negotiable.
And if you're drying your herbs, invest in some good airtight glass containers. Keep them in a cool, dark spot like a pantry. Light and air are the enemies of dried herbs, and they'll zap the flavor right out of them over time.
What to Do When Your Fresh Herbs Go Wrong
Even when you do everything right, herbs can be a bit dramatic. You followed the steps, gave them a nice spot in the fridge, and yet... your cilantro is looking sad. Don't sweat it. Most of the time, these issues boil down to a few common culprits that are surprisingly easy to fix.
Let's walk through some of the most frequent frustrations. Think of this as becoming an herb whisperer—learning to spot the signs and knowing exactly how to react.
Why Are My Herbs Turning Yellow?
Yellowing leaves are the classic sign of herb distress. It’s their way of saying they’re running out of steam and breaking down the chlorophyll that keeps them vibrant and green.
This usually points to one of two things:
- They're just old. Herbs have a short lifespan, and they may have already been on the shelf for a few days before you even bought them.
- The water is funky. If you're storing them in a jar, old water can get stagnant and stress out the plant. You really do need to change that water every two days.
If you just see a few yellow leaves, pluck them off and carry on. The rest of the bunch is probably still good. If the whole thing is starting to look pale, it's time to use them up tonight.
Tackling Slimy Stems and Leaves
There's nothing more disappointing than reaching for fresh parsley and finding a slimy mess. Slime is a dead giveaway for decay, and it’s almost always caused by one thing: too much moisture.
When leaves are squished together or left sitting in water, they can't breathe. This creates a playground for bacteria, which breaks down the herb's cell walls into that dreaded goo. Cilantro and parsley are notorious for this.
The best defense is to make sure your herbs are as dry as possible before you store them. And if you're using the bouquet-in-a-jar method, always strip off any leaves that would sit below the water line.
Pro Tip: If you catch a bit of slime on just a few stems, you can often save the rest. Just toss the slimy bits, give the healthy stems a gentle rinse, and pat them completely dry before putting them back in a clean container with fresh water.
How to Revive Limp and Wilted Herbs
Did you leave that bunch of mint on the counter a little too long? A limp bundle doesn't have to be a lost cause. More often than not, your herbs are just thirsty and can be shocked back to life.
This trick works like a charm for tender herbs like cilantro, parsley, dill, and mint.
- Prep an ice bath. Grab a big bowl and fill it with ice and cold water.
- Give the stems a fresh cut. Snip about a half-inch off the bottom. This opens up their pores, helping them drink more efficiently.
- Dunk the whole bunch. Submerge all of it—stems, leaves, everything—right into the ice water.
- Just wait. Let them soak for 15 to 30 minutes. You’ll be amazed to see them perk right back up, regaining their crispness and color.
After their spa treatment, gently pat them dry and store them properly. This trick won't save herbs that are already slimy or yellow, but for a simple case of wilting, it’s a total game-changer.
Your Top Herb Storage Questions Answered
Even when you feel like you've got a handle on things, a few questions always seem to pop up. Let's walk through some of the most common ones I hear, so you can store your herbs like a seasoned pro.
Can I Just Store All My Herbs Together?
It's so tempting to just bundle everything into one big, happy bouquet, but trust me on this one—it’s not a great idea. Hardy herbs and tender herbs are like different personalities; they have completely different needs. Stashing them together usually means one type will give up the ghost long before the other.
Plus, some herbs are known to release ethylene gas, which is a natural ripening agent. This can make their more delicate neighbors wilt and turn yellow way too fast. If you're really in a pinch for space, at least try to group like with like. For instance, cilantro and parsley often get along just fine in the same jar of water since they have similar requirements.
Do I Really Need to Wash Herbs Before I Store Them?
Yes, but there's a huge catch: they have to be completely dry before you put them away. Giving your herbs a good rinse as soon as you bring them home gets rid of any dirt or bacteria they picked up at the market. But—and this is a big but—any lingering dampness is a fast track to mold and slimy leaves.
Your best friend for this task is a salad spinner. Seriously, it's a game-changer. If you don't have one, you'll need to patiently pat the herbs bone-dry with a clean dish towel or a few layers of paper towels. Even a little bit of moisture can cut their life in half.
My Two Cents: Think clean and dry. Washing is great for getting rid of grit, but drying them completely is what actually keeps them from turning into a science experiment in your fridge.
What’s the Deal with Storing Basil?
Ah, basil. It’s the drama queen of the herb world and breaks all the rules. The cold of a refrigerator is its mortal enemy, causing something called chilling injury that turns those beautiful green leaves into a sad, blackened mess. Keep it out of the fridge, no exceptions.
The absolute best way to handle basil is to treat it like a fresh-cut bouquet right on your kitchen counter.
- Give the stems a fresh trim, just like you would for flowers.
- Pop the bunch into a glass or jar with an inch or so of water.
- Find a spot for it on your counter, but keep it out of direct, harsh sunlight.
- Swap out the water every day or two.
Do this, and your basil will stay perky and fragrant for a week, maybe even longer. It’ll be right there waiting for you when you're ready to make a caprese salad or whip up some pesto.
How Can I Tell if My Frozen or Dried Herbs Are Still Good?
It's a great question—after all, what's the point of preserving herbs if they don't add any flavor?
For frozen herbs, freezer burn is the main culprit. Look for dry, frosty patches or a noticeable loss of that vibrant green color. They're still safe to eat, but if they look dull and faded, they've lost most of their essential oils and won't contribute much to your dish.
For dried herbs, your sense of smell is your best tool. Take a small pinch and crush it between your fingers. If you get a burst of that familiar, potent aroma, you're in business. If it smells faint, dusty, or like nothing at all, it's time to refresh your supply.
At Cooler Kitchen, we’re all about smart tools that help you cut down on food waste and find more joy in the kitchen. From mini salad spinners perfect for getting herbs dry to clever storage solutions, we've got what you need to make your fresh ingredients last. Check out our full collection at https://www.coolerkitchen.com.