
Best way to clean microwave interior: Simple, Natural Methods That Work
When it comes to cleaning the inside of your microwave, forget the harsh chemicals and endless scrubbing. The absolute best way to clean a microwave interior is with a simple, natural steam-cleaning trick using just water and either vinegar or lemon. This method is a game-changer; it loosens up even the most stubborn, baked-on food splatters, letting you wipe them away with almost no effort.
Why Natural Cleaning Is the Smart Choice
We’ve all had that moment—opening the microwave to find a tomato sauce explosion, a greasy film coating every surface, or the ghost of burnt popcorn past. A messy microwave is a universal kitchen problem, but the fix doesn't need to come from a bottle of aggressive cleaning spray.
Turning to ingredients you probably already have in your pantry is not only surprisingly effective but also much safer for your appliance and your food. Natural steam cleaning gets right to the heart of the problem, using super-heated water vapor to break down grime on a molecular level. It’s simple, smart, and does the heavy lifting for you.
Here's why this approach just makes sense:
- It’s Chemical-Free: You avoid leaving potentially harmful residues behind in the very place you heat your meals.
- It’s Inexpensive: A splash of vinegar or half a lemon costs next to nothing compared to specialized cleaners.
- It Protects Your Appliance: Abrasive sponges and harsh chemicals can easily scratch or damage the microwave's interior coating over time. Natural methods are gentle.
- It Deodorizes Naturally: Ingredients like lemon and vinegar don't just cover up funky smells—they actually neutralize the bacteria causing them.
An Effortless Method for a Nasty Job
The days of scraping at dried-on gunk are over. The beauty of this steam-cleaning technique is how it transforms a dreaded chore into a quick, satisfying task. By creating a hot, steamy environment, the acidic moisture softens even the crustiest messes.
After just a few minutes of steaming, most of the grime will wipe away cleanly with a soft cloth or sponge. It's an efficient and safe process that fits perfectly into any busy kitchen routine. If you're looking for even more tips, this additional comprehensive guide on how to clean your microwave is a great resource.
Key Takeaway: The goal isn't just to get the microwave clean. It's to do it safely, efficiently, and in a way that helps your appliance last longer. Natural steam cleaning nails all three.
Quick Guide to Natural Microwave Cleaning Methods
Here's a quick rundown of the most popular natural steam-cleaning solutions. Each uses the same basic principle—heat a bowl of liquid to create steam—but offers slightly different benefits.
| Method | Key Ingredients | Primary Benefit | Best For |
|---|---|---|---|
| Vinegar Steam | 1 cup water, 2 tbsp white vinegar | Powerful degreasing | Cutting through greasy, stubborn food splatters |
| Lemon Steam | 1 cup water, 1 sliced lemon | Deodorizing & cleaning | Getting rid of strong odors (fish, burnt popcorn) |
| Baking Soda Steam | 1 cup water, 2 tbsp baking soda | Neutralizing odors | Mild cleaning and tackling tough, lingering smells |
| Just Water | 1 cup water | Basic loosening | Light, fresh spills that haven't baked on yet |
No matter which method you choose, the result is the same: a sparkling clean microwave achieved with minimal elbow grease and maximum peace of mind.
Assembling Your Cleaning Toolkit
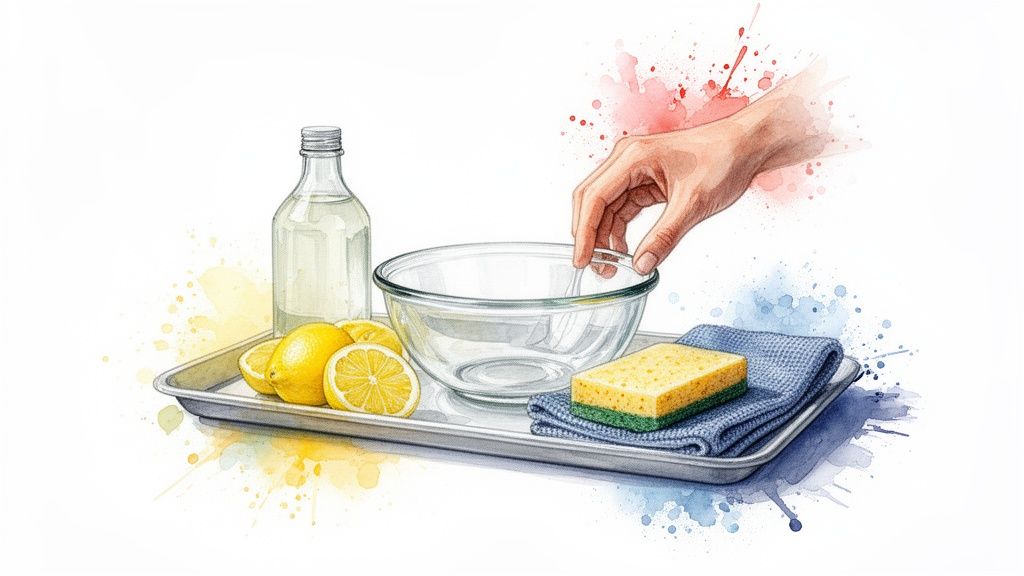
Before you dive in, let’s get your cleaning gear ready. Having everything you need within arm's reach is the secret to turning this from a dreaded chore into a quick five-minute job. The best part? You almost certainly have all these items in your kitchen already.
The star of the show is a simple microwave-safe bowl or measuring cup. Anything from a glass Pyrex dish to a sturdy ceramic bowl will do the trick. This is what we'll use to create a powerful steam bath that does most of the hard work for you.
You'll also need a couple of good cloths to wipe away all that loosened-up grime. I always reach for a microfiber cloth.
Choosing the Right Wiping Tools
So, why microfiber? It’s all in the science. The tiny fibers are phenomenal at grabbing onto grease and food bits instead of just smearing them around. Paper towels, on the other hand, just can't handle the job—they fall apart and leave behind a trail of linty fuzz.
For those slightly more caked-on splatters, a non-abrasive sponge is your go-to. Use the soft side for general wiping and the scouring side for a little extra elbow grease. It’s gentle enough not to cause any damage. It’s a bit like why we use quality, easy-to-clean cutting boards; the right tool protects your kitchen gear for the long haul.
Critical Tip: Whatever you do, never use steel wool, Brillo pads, or any other harsh scrubbers inside your microwave. They will absolutely ruin the interior coating, leaving permanent scratches that can trap bacteria and even lead to rust.
What to Avoid at All Costs
Knowing what not to use is just as important as knowing what to use. Grabbing the wrong cleaner can do serious, irreversible damage to your appliance.
Steer clear of any harsh chemical cleaners unless they are specifically marked as safe for microwave interiors. This means absolutely no:
- Bleach-based cleaners: The fumes can linger, and the bleach can damage the plastic and metal components over time.
- Oven cleaners: These are formulated for heavy-duty, baked-on grease in a conventional oven and are far too aggressive for a microwave's interior.
- Ammonia: This can be corrosive and degrade the materials inside your microwave.
Now that you have your simple, safe toolkit all lined up, you're ready to tackle the mess.
Using Natural Steam to Clean Your Microwave
This is where the real magic happens. Forget the harsh chemicals and endless scrubbing. By using simple steam, you can convince stubborn, caked-on food to practically wipe itself away. It’s easily the best way to clean a microwave interior because it does all the heavy lifting for you.
The science behind it is pretty straightforward. Heating water creates steam that billows and fills the entire microwave cavity. This hot, moist air gets to work softening dried-on splatters, loosening their death grip on the interior walls. When you add a natural acid like vinegar or lemon juice, you're also bringing a powerful degreasing agent into the fight.
This whole process isn't that different from what you might do in the kitchen. For instance, you can use the same principle to https://www.coolerkitchen.com/blogs/cooler-kitchen-blog/steam-your-fish-in-parchment for a healthy, delicious meal. In both cases, contained steam is the secret to a fantastic result.
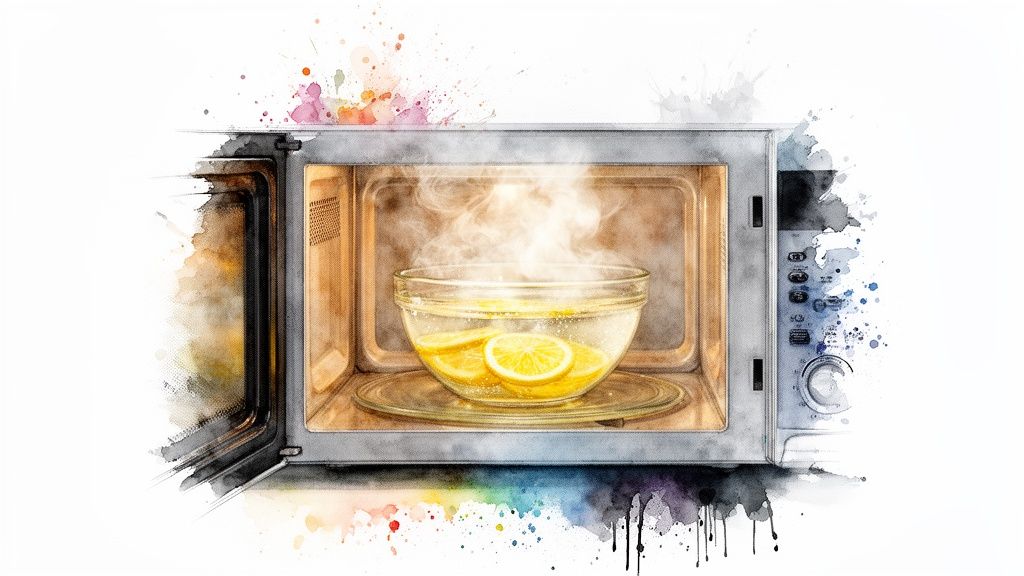
The White Vinegar Method for Tough Grease
If your microwave has seen better days thanks to greasy splatters, white vinegar is your new best friend. The acetic acid in it is a champ at cutting through grease and grime, leaving the surfaces sparkling clean.
Here's how you do it:
- Grab a microwave-safe bowl. A simple glass measuring cup is perfect for this.
- Pour in one cup of water and add two tablespoons of white vinegar.
- Place the bowl on the turntable and zap it on high for about five minutes. You want to see it come to a good, rolling boil to generate all that grime-busting steam.
Once the timer dings, don't open the door just yet.
Pro Tip: The most crucial part of this whole process is patience. Let the bowl sit inside the closed microwave for an extra five minutes after it's done heating. This gives the trapped steam time to really penetrate and soften every last bit of stuck-on food.
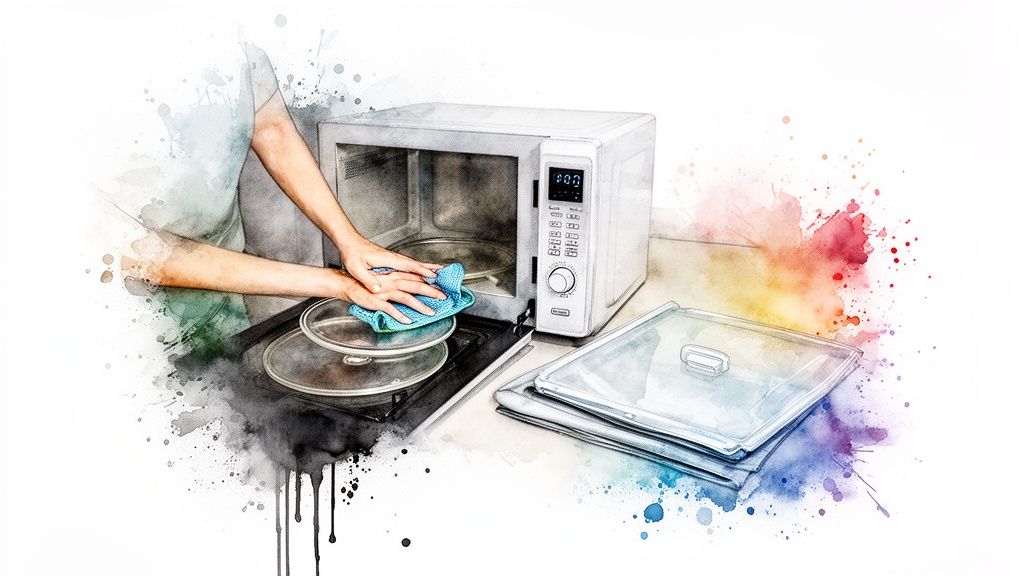
After waiting, carefully remove the hot bowl. Now, take a sponge or microfiber cloth and simply wipe down the inside. You'll be amazed at how easily the mess comes off with hardly any elbow grease.
The Lemon Method for a Fresh Scent
Struggling with the ghost of last week's fish or that one time you burned the popcorn? The lemon method is your answer. It doesn't just clean; it leaves your whole kitchen smelling bright and citrusy.
Lemons contain citric acid, a natural cleaning agent that doubles as a fantastic deodorizer. The process is almost the same as the vinegar trick, just with a much nicer aroma.
- Cut a lemon in half. Squeeze the juice into a microwave-safe bowl with about a cup of water.
- Toss the squeezed lemon halves right into the bowl, too.
- Microwave the mixture on high for three to five minutes, or until the water is steaming like crazy.
- Just like before, let it sit with the door closed for another five minutes so the citrusy steam can work its magic.
Finally, take the bowl out and wipe everything down. The citric acid will have dissolved the splatters while neutralizing any funky smells. If you're into green cleaning, this is a great trick to have up your sleeve. For more ideas, you might want to check out an all-natural cleaning guide for other safe and effective home tips. This method truly is a one-two punch of cleaning and deodorizing.
How to Remove Stubborn Grease and Baked-On Food

Sometimes a good steam clean just isn't enough. We've all been there—you open the microwave door and discover a spaghetti sauce explosion from last week that has practically fossilized onto the walls. When steam alone doesn’t cut it, it's time to bring in a gentle but powerful scrubbing agent.
This is where baking soda becomes your secret weapon. It’s the perfect solution for tough jobs, acting as a mild abrasive that can lift away grime without scratching the delicate interior of your appliance. Better yet, unlike harsh chemical cleaners, it’s completely food-safe and won't leave behind any questionable residues.
Creating and Using a Baking Soda Paste
Think of this as a targeted deep-cleaning treatment for those stubborn, baked-on messes that steam couldn't touch.
First, you’ll want to whip up a simple paste. Just mix a few tablespoons of baking soda with a splash of water until you get a thick, spreadable consistency, almost like toothpaste.
With your paste ready, it's time to get to work.
- Get a sponge or cloth damp and dip it into the paste.
- Apply the paste directly to the problem areas—that greasy buildup on the ceiling or those dried-on splatters on the side walls.
- Scrub the grime away using gentle, circular motions. The paste provides just enough grit to dislodge the food without causing any damage.
For a particularly nasty spot, like a patch of burnt-on cheese, don't be afraid to apply a thicker layer of the paste and just let it sit for about five minutes. This gives the baking soda time to work its magic and break down the gunk, making it much easier to wipe away.
Expert Insight: The power of the baking soda paste is its dual-action approach. It chemically helps break down greasy food particles while its fine, crystalline structure provides the physical scrubbing power to lift them right off the surface. It's a classic one-two punch for stubborn microwave messes.
Don't Forget the Turntable and Roller Ring
A truly clean microwave isn't just about the walls and ceiling. The turntable and the roller ring underneath it are often ground zero for spills and drips, accumulating a sticky film of grease and food residue.
Luckily, this is usually the easiest part of the job. Carefully remove both the glass plate and the plastic roller ring. Most of the time, these parts are dishwasher-safe, which makes cleaning them effortless. Just pop them on the top rack and run a normal cycle.
If you'd rather hand-wash them (or if they aren't dishwasher-safe), a quick scrub in the sink with warm, soapy water will do the trick. Use a non-abrasive sponge to get into the little crevices of the roller ring where crumbs love to hide. Just make sure both are completely dry before you put them back inside.
Interestingly, your microwave's cleaning power isn't limited to just its own interior. Research has shown that microwaving a damp kitchen sponge is one of the most effective ways to kill off nasty bacteria. You can read the full study on the NIH's research on microwave sanitization to learn more about it.
Building a Simple Microwave Maintenance Routine
The real secret to never having to deep-scrub your microwave is to make cleaning a small, consistent habit instead of a huge, dreaded event. A simple maintenance routine stops food from becoming a permanent resident on the walls of your appliance, saving you a ton of time and effort down the road. It’s all about being proactive.
Think about it this way: wiping up a fresh soup splatter takes seconds. But trying to chisel off a fossilized, baked-on mess from last week’s spaghetti requires serious elbow grease. The best way to clean a microwave interior is to stop it from getting truly filthy in the first place.
This approach lines up with what the pros recommend. Most cleaning experts, like those at Whirlpool, suggest a quick weekly wipe-down to prevent stubborn buildup before it even starts. This simple frequency keeps splatters and steam from turning into a much bigger problem.
Your Five-Minute Weekly Reset
You don't need to block off your afternoon for this. Setting aside just five minutes each week is more than enough to keep your microwave looking and smelling fresh. This isn't a deep clean; think of it as a quick refresh to tackle any minor splatters that have popped up.
Here’s a simple and effective routine that works every time:
- Steam It Up: Fill a microwave-safe bowl with about a cup of water. If you want a little extra cleaning and deodorizing power, add a splash of white vinegar or a few lemon slices.
- Heat and Wait: Pop the bowl in and microwave it on high for about three minutes. When the timer goes off, don't open the door right away. Let it sit for another two or three minutes so the steam can really do its thing.
- Wipe It Down: Carefully take out the hot bowl. Use a damp microfiber cloth or a sponge to wipe down the ceiling, walls, and inside of the door. The steam will have softened up any grime, making it easy to wipe away.
- Don't Forget the Turntable: Give the glass turntable a quick wipe with the same cloth before you put it back.
Key Takeaway: Consistency is everything. A quick weekly wipe-down prevents the small messes from graduating into major cleaning projects. It transforms microwave upkeep from a dreaded chore into a simple part of tidying the kitchen.
Daily Habits That Make a Difference
Beyond the weekly reset, a couple of tiny daily habits will dramatically reduce how often you need to clean at all. These are the ultimate time-saving hacks for a pristine microwave.
First, wipe up spills the moment they happen. See a splatter? Grab a damp cloth and wipe it away while it's still fresh. It takes less than ten seconds but prevents that food from cooking on again and again, becoming a stubborn stain.
Second, always use a microwave-safe cover. This is non-negotiable for reheating anything that might splatter, like sauces, soups, or gravies. A simple cover contains the mess, keeping your microwave interior spotless. This small change also helps prevent food waste from sticking to the appliance—another plus for anyone using a countertop compost bin with an EZ-no-lock lid to manage kitchen scraps.
Finally, give the outside a little love, too. A quick wipe of the handle and keypad with a multi-purpose cleaner on a cloth removes fingerprints and germs. A clean exterior just makes the whole appliance look better and feel more hygienic.
Got Questions? We've Got Answers
Even the most straightforward cleaning job can throw you a curveball. What about that smell that just won't go away? Or those weird metal racks? Let's tackle some of the most common questions people have when cleaning their microwave.
Knowing how to handle these specific situations will make you feel like a pro and keep your microwave in top shape.
How Can I Get Rid of That Awful Burnt Smell?
A lingering burnt smell is one of the most stubborn kitchen odors. You've cleaned everything, but the ghost of burnt popcorn remains. I've been there, and it's incredibly frustrating.
Here’s a trick that works wonders. Grab a microwave-safe bowl and fill it with about a cup of water. Now, add either a few tablespoons of fresh coffee grounds or a handful of lemon or orange peels.
Microwave the mixture for 2-3 minutes, just long enough to get it steaming nicely. Once it's done, leave the door shut. Let it sit for at least 15 minutes. The aromatic steam will circulate, actively neutralizing that nasty burnt scent.
If the smell is really, really bad, unplug the microwave overnight and leave an open box of baking soda inside. It’s a classic for a reason—it works by absorbing any odor particles that are still hanging around.
Are Commercial Cleaning Wipes Safe to Use in a Microwave?
It’s so tempting to just grab a disinfecting wipe for a quick pass, right? While convenient, you need to be careful. Many of those all-purpose wipes contain chemicals that aren't food-safe. Once you heat the microwave, those chemicals can release fumes or leave a residue right where you cook your food. Not ideal.
Always, and I mean always, check the label. If it doesn't explicitly say it's safe for food-contact surfaces, don't use it inside your microwave.
My Advice? Play it safe. When you're not sure, just stick with the simple, natural cleaners we've talked about—vinegar, lemon, baking soda. If you must use a commercial cleaner, make sure you wipe the entire interior down with a clean, damp cloth afterward to get rid of any residue before you heat up your next meal.
What’s the Deal with These Metal Racks?
Many larger microwaves, especially convection models, come with metal racks for bi-level cooking. These are not a permanent part of the microwave and need to be handled differently.
Here’s the most important thing to know: you must remove metal racks before running a standard microwave cycle or doing a steam clean. If you don't, you risk creating electrical arcs—sparks and flashes of light—that can seriously damage your appliance. It's a scary sight and an expensive mistake.
Treat the racks like any other dish.
- Take them out of the (cool!) microwave.
- Wash them by hand in your sink with warm, soapy water.
- A non-abrasive sponge is perfect for scrubbing off any baked-on gunk.
- Rinse them well and let them air dry completely before putting them back.
I wouldn't recommend putting them in the dishwasher. The harsh detergents and high heat can ruin the finish. Your user manual is your best friend here, so give it a quick look for any specific instructions. A little extra care goes a long way in keeping your microwave safe and sound.
At Cooler Kitchen, we believe in making kitchen tasks simpler and safer with thoughtfully designed tools. Our range of durable, easy-to-clean kitchenware helps you maintain a pristine and efficient cooking space every day. Explore our collection at https://www.coolerkitchen.com.