
How to Sharpen a Knife with a Sharpener for Perfect Results
Sharpening a knife is all about drawing the blade across an abrasive surface to bring a fine edge back to life. Whether you're pulling it through a simple sharpener or gliding it across a stone, the secret sauce is holding a consistent angle. From there, it's just a matter of moving to finer and finer abrasives until you've got a razor-sharp finish that lasts. This one skill can transform a frustrating, dangerous tool into your most reliable kitchen companion.
Why a Sharp Knife Is a Safer and Better Kitchen Tool
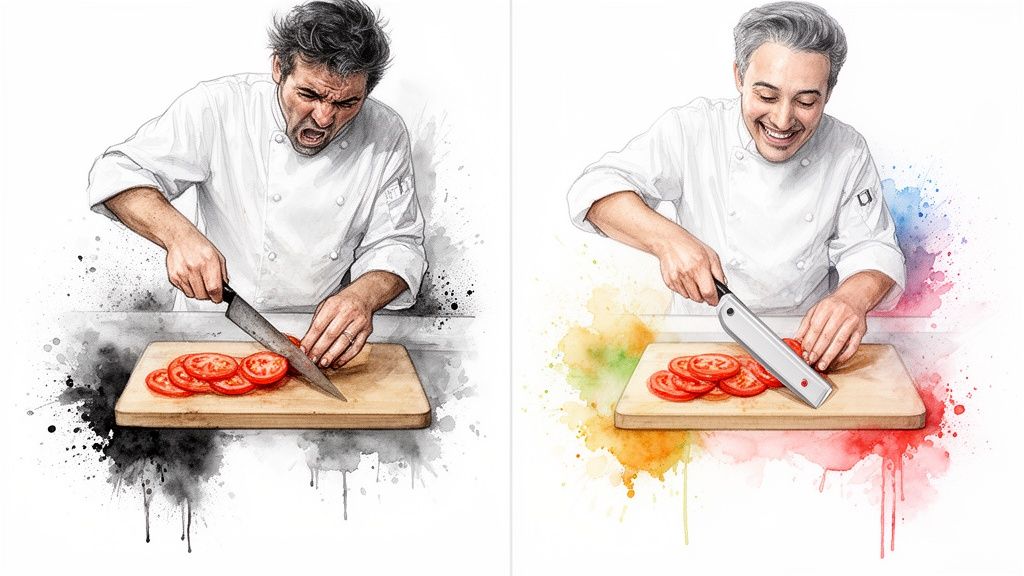
Here's a kitchen truth that surprises a lot of people: a wickedly sharp knife is far safer than a dull one. It sounds counterintuitive, but it's true. When your knife is dull, you have to push down hard to get it to cut. That extra force is exactly what makes the blade slip off a tough onion skin or a waxy pepper and slice your finger instead.
A sharp knife, on the other hand, does the work for you. It bites into food with just a little bit of pressure, giving you complete control and clean, precise cuts every time.
Imagine trying to slice a ripe tomato. A dull knife just squishes it, mangling the delicate skin and leaving you with a pulpy mess. A perfectly sharpened knife glides right through, creating those beautiful, paper-thin slices you see in restaurants. It's not just about looks—it's about making cooking easier, faster, and genuinely more fun.
Unlocking Your Knife's True Potential
Learning how to sharpen your knives isn't a chore; think of it as an investment in your tools. It’s how you unlock the performance they were designed for in the first place. A sharp edge doesn’t just slice better—it actually helps preserve your ingredients by preventing the bruising and browning you get with fresh herbs and produce. This is exactly why professional chefs are so meticulous about keeping their blades in top shape. To get a better feel for what makes a great foundational kitchen knife, this comprehensive Chef Knife Guide is a fantastic resource.
It's clear home cooks are catching on. The global market for knife sharpeners jumped from $668.57 million in 2021 and is on track to hit $796.4 million by 2025. That 19.1% growth shows just how many people are finally discovering the massive difference a sharp edge makes. More importantly, safety studies have shown that using a dull knife can increase your risk of getting cut by up to four times. A simple sharpener isn't a luxury; it's a critical safety tool.
Key Takeaway: A sharp knife requires less force, which means more control for you. It's not just more efficient—it's fundamentally safer for everything from complex recipes to simple meal prep.
In this guide, we'll walk through the most common ways to get that perfect edge:
- Manual Pull-Through Sharpeners: These are perfect for quick, no-fuss touch-ups.
- Electric Sharpeners: The best choice for bringing a seriously dull knife back from the dead with almost no effort.
- Whetstones and Guided Systems: For the cook who wants ultimate control and a flawless, professional-grade edge.
Each sharpener has its place, and the right one for you really just depends on your knives and your comfort level. Remember, once your knives are sharp, the surface you cut on matters. Using a good cutting board, like this easy-to-clean bamboo cutting board, will help protect that fresh edge and give you a more stable cutting experience.
Choosing the Right Sharpener for Your Knives
Walking into a kitchen store and seeing a wall of knife sharpeners can feel a bit overwhelming. But the good news is, you can boil it all down to three main types, each designed for a different kind of cook. The best choice for you really depends on what kind of knives you own, your budget, and frankly, how much time you want to spend keeping them sharp.
Think of it like making coffee. Some people just want a quick pod for convenience, while others love the ritual of a perfect pour-over. Neither is wrong, they just fit different lifestyles.
It’s the same with sharpeners. Are you looking for a quick, no-fuss fix for your everyday knives, or do you enjoy the craft of honing an edge to razor-sharp perfection? Let's dig into the main options.
Manual Pull-Through Sharpeners
For most of us just trying to get dinner on the table, a manual pull-through sharpener is a fantastic place to start. These little gadgets are all about speed and simplicity. They usually have a couple of slots: a coarse one to reshape a dull edge and a fine one to polish it up.
The biggest win here is the pre-set angle. You don't have to guess or worry about getting it wrong, which is usually the biggest hurdle for anyone new to sharpening. If you just want to get your knives sharp and get back to chopping, this is your most direct route. They're also small and affordable, so you can just toss one in a drawer.
Electric Knife Sharpeners
Got a block full of seriously dull knives that haven't seen a sharpener in years? Or maybe you just want the job done as fast as possible. An electric sharpener is your best friend. These machines use motorized abrasive wheels to do all the hard work for you, often bringing a blade back to life in less than a minute.
Just like their manual cousins, they have built-in angle guides, so you get a consistent edge every single time. They do cost more and take up a bit of counter space, but their power to revive even the most neglected knives with almost no effort is a huge plus for anyone who values efficiency.
Pro Tip: Whether you're using a manual or electric sharpener, the secret is a light touch. Let the abrasives do the work. Jamming the blade through can actually remove too much steel and give you a wonky, uneven edge.
Whetstones and Guided Systems
For the home chef who truly geeks out on their gear, whetstones (also called sharpening stones) offer the ultimate control. This is the traditional, hands-on method that lets you set the exact angle you want for each specific knife, whether it's a beefy German chef's knife or a delicate Japanese santoku.
Learning to use a whetstone definitely takes some practice, but it's a deeply rewarding skill that produces a superior, long-lasting edge. It really connects you to your tools. You’ll find stones in a huge range of grits, from coarse ones that can fix a chipped blade to super-fine ones that polish the edge until it’s like a razor.
If that sounds appealing but you want more control over your tools, a professional 12-piece knife set might be the perfect inspiration to explore more advanced sharpening techniques.
It’s no surprise that more people are getting into proper knife care. The knife sharpening market is expected to grow from $0.75 billion in 2024 to a projected $1.2 billion by 2034. And home cooks are leading the charge, making up 55% of that market. You can read more about the rise of at-home knife care if you're curious, but it just goes to show that people are realizing a sharp knife is a safe and effective knife.
Knife Sharpener Comparison Guide
Still on the fence? Here’s a quick breakdown to help you find the perfect match for your kitchen.
| Sharpener Type | Best For | Ease of Use | Pros | Cons |
|---|---|---|---|---|
| Manual Pull-Through | Quick touch-ups and beginners | Very Easy | Affordable, compact, foolproof pre-set angles | Less precise, can wear knives faster over time |
| Electric Sharpener | Restoring very dull knives, speed & convenience | Easy | Extremely fast, consistent results, minimal effort | Expensive, bulky, removes more metal |
| Whetstone | Enthusiasts, high-end knives, total precision | Difficult | Superior edge quality, ultimate control, long-lasting | Steep learning curve, time-consuming |
| Guided System | Precision without the freehand skill of whetstones | Moderate | High control, consistent angles, excellent results | Can be complex to set up, more expensive than manual |
Ultimately, the "best" sharpener is the one you'll actually use. Whether it's a quick pull-through before dicing onions or a weekend whetstone session, keeping your knives sharp makes cooking safer, faster, and a whole lot more fun.
Getting the Most Out of Manual and Electric Sharpeners
Let's be honest, for most of us in our home kitchens, sharpening a knife shouldn't feel like a major project. The great news is, it doesn't have to. Modern manual and electric sharpeners are designed to give you a great cutting edge without the fuss or steep learning curve of traditional methods.
If you’re looking for a quick and simple way to learn how to sharpen a knife with a sharpener, these tools are your best bet. They have built-in angle guides, which completely removes the biggest headache of sharpening. Your only job is to provide a smooth, steady hand and let the sharpener do its thing.
Taming the Manual Pull-Through Sharpener
The manual pull-through sharpener is the essence of kitchen convenience. It’s compact, budget-friendly, and you can figure it out in about ten seconds. Most of these have two slots, and understanding what each one does is the key.
- The Coarse Slot: This is where you start with a truly dull knife. It's usually made of super-hard materials like carbide or diamond that quickly grind a new edge onto the blade. Think of it as the heavy-lifting stage.
- The Fine Slot: Once the coarse slot has done its job, you move here. This slot, often made of ceramic, is all about refinement. It hones and polishes the edge, smoothing out any microscopic roughness for a clean, sharp finish.
Using one is simple. Plant the sharpener on a stable surface—your countertop is perfect. Hold it down firmly with one hand. Now, take your knife and place the heel (the part of the blade closest to the handle) into the coarse slot.
With light, even pressure, pull the knife straight back towards you. It should be one smooth, continuous motion from the heel all the way to the tip. Don't press down hard—that's a common mistake. Just let the abrasives do the work. Do this three to five times. Next, switch to the fine slot and do the exact same thing for another three to five pulls to polish it up.
My Two Cents: Consistency is everything with these sharpeners. Don't rock the blade back and forth or try to muscle it through. A light, smooth glide is what you're aiming for. It's counterintuitive, but less pressure often gives you a better, more even edge.
Let the Electric Sharpener Do the Work for You
Think of an electric sharpener as the express lane for knife maintenance. It's fantastic for bringing a whole block of dull knives back to life or if you just want the job done fast. These machines use spinning, motorized abrasive wheels to make quick and almost effortless work of sharpening. They might look a little intimidating, but they’re incredibly straightforward.
Just like their manual cousins, electric models have multiple stages. The process is a bit different, though. Instead of one slot you pull through, you’ll usually have separate slots for the left and right sides of the blade for each sharpening stage.
First, turn the machine on and start with the coarsest stage. Gently guide one side of the blade into its slot until it makes contact with the grinding wheel. Now, pull the knife smoothly towards you at a consistent speed. For a standard chef's knife, this should take about three to four seconds.
Here’s the most important part: always alternate sides with each pass. After pulling the left side of the blade through its slot, immediately do the right side in the right slot. This is critical for creating an even bevel on both sides of your knife. A couple of passes per side in the coarse stage is usually plenty.
Finally, move to the finest stage and repeat that same alternating process, giving each side one or two passes to polish the edge to a razor-sharp finish. The whole thing often takes less than a minute per knife. Just make sure to wipe the blade clean with a cloth afterwards to get rid of any tiny metal filings.
The Art of Sharpening with a Whetstone
When you're ready to move beyond pull-through and electric models, the whetstone is where you get complete control over your knife's edge. This isn't about speed. Think of it as a rewarding skill that connects you to your tools and produces a sharpness that other methods just can't touch. There's a reason it’s the traditional approach—it offers a level of precision that can extend the life of your very best knives.
First things first, you need to understand grit. It's basically sandpaper for your knife. A low grit number, like 400, is coarse and shaves off more metal, which is perfect for fixing a seriously dull or chipped edge. A high grit number, maybe 1000 or more, is for finishing and polishing the blade to that razor-sharp state.
Most whetstones—often called water stones—need a good soak before you start. Just submerge your stone for about 5-10 minutes, or at least until it stops bubbling. That water acts as a lubricant, creating a slurry of abrasive particles that does the real sharpening work while carrying away the tiny metal filings.
Finding and Holding the Perfect Angle
Here’s the part that trips most people up: maintaining a consistent angle. For most Western-style kitchen knives, you’re aiming for a 15-20 degree angle. Japanese knives, which typically use harder steel, need a much finer, more acute angle, something closer to 12-15 degrees.
Want a great trick to build that muscle memory? Grab a permanent marker.
- Color the entire cutting edge on both sides of the knife.
- Take a few practice strokes on the stone.
- Now, look at the edge. If the marker is only gone from the very tip, your angle is too high. If it’s gone from the shoulder but not the edge, your angle is too low.
- You’ve found the sweet spot when the marker is removed evenly from the entire bevel.
Consistency is everything. Seriously. It's far better to hold a steady 22-degree angle than to wobble between 15 and 20 degrees. A consistent angle creates a clean, uniform edge that will slice smoothly and stay sharp longer.
Once you’ve found your angle, the motion is one long, sweeping stroke. Start with the heel of the blade on the stone and, holding that angle, sweep the knife forward as if you're trying to slice a paper-thin layer off the top. The goal is to make sure the entire blade, from heel to tip, glides across the stone in one fluid motion.
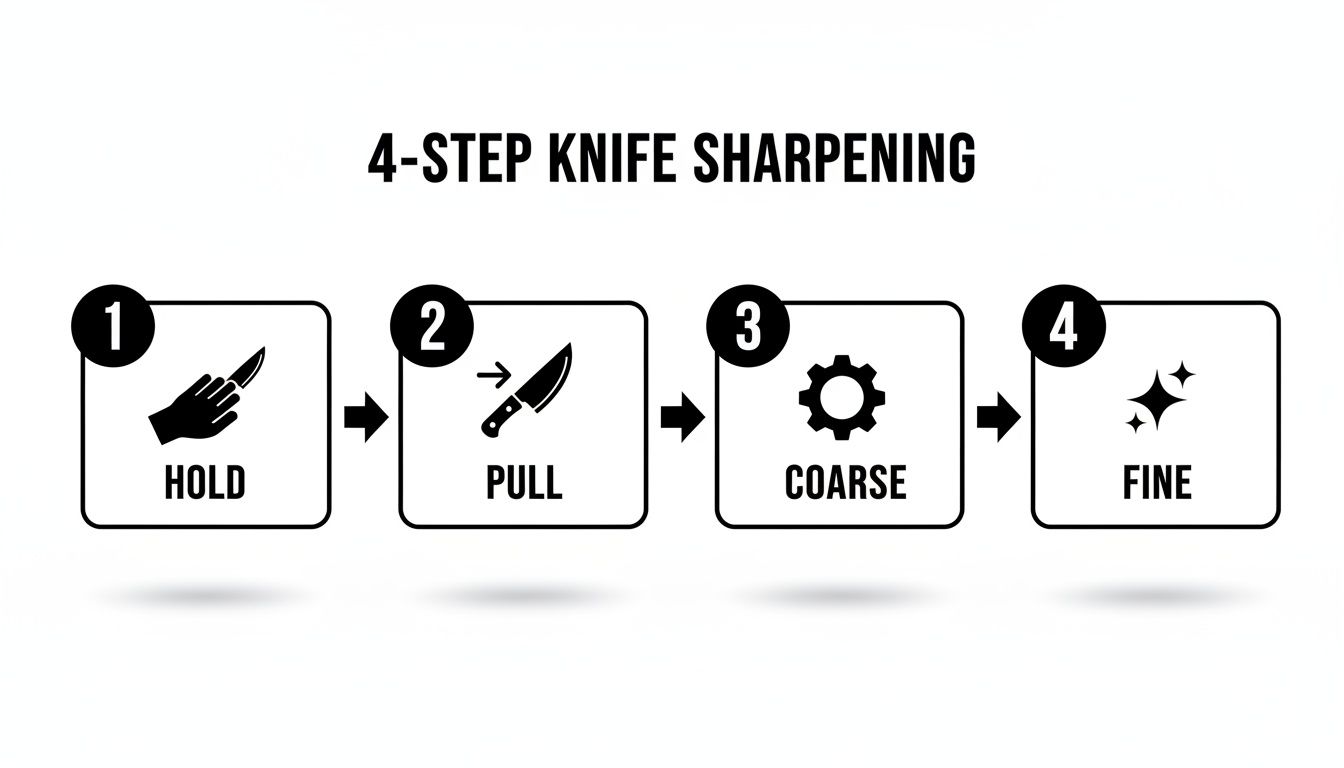
This visual breaks down the sharpening process into its core components, showing the progression from your initial setup to that final, polished edge.
Feeling for the Burr
So, how do you know when one side is done? You're looking for a burr. This is a tiny, almost microscopic ridge of metal that forms along the edge on the side opposite of the one you're sharpening. You can feel it by carefully running your thumb or fingernail down the side of the blade (never along the edge!).
When you can feel that burr all the way down the blade, that side is done. It's time to flip the knife over and do the exact same thing on the other side, using the same number of strokes, until you raise a burr there, too. A few light, alternating strokes on each side will knock that burr off, leaving you with a perfectly centered, incredibly sharp edge.
Even with a perfect whetstone session, daily upkeep is what makes it last. The knife sharpening rod market is projected to grow from $450 million in 2025 to $650 million by 2033, which tells you just how many people are looking for simple maintenance tools. A dull knife can increase the effort needed to cut by 50%, but a few quick passes on a honing rod can restore up to 80% of its slicing power, bridging the gap between major sharpenings. If you want to dive deeper, you can find more insights on the demand for effective knife maintenance tools. Learning to master a whetstone is the first big step.
How to Test for Sharpness and Maintain Your Edge
Alright, you've put in the work with your sharpener. So, how sharp is your knife really? Before you even think about swiping your thumb across the blade—don't do it!—there are much safer (and more telling) ways to check your handiwork.
These quick tests will give you instant feedback. You'll know right away if you need another go with a fine-grit abrasive or if you've hit that sweet spot of slicing perfection.
Safe and Simple Sharpness Tests
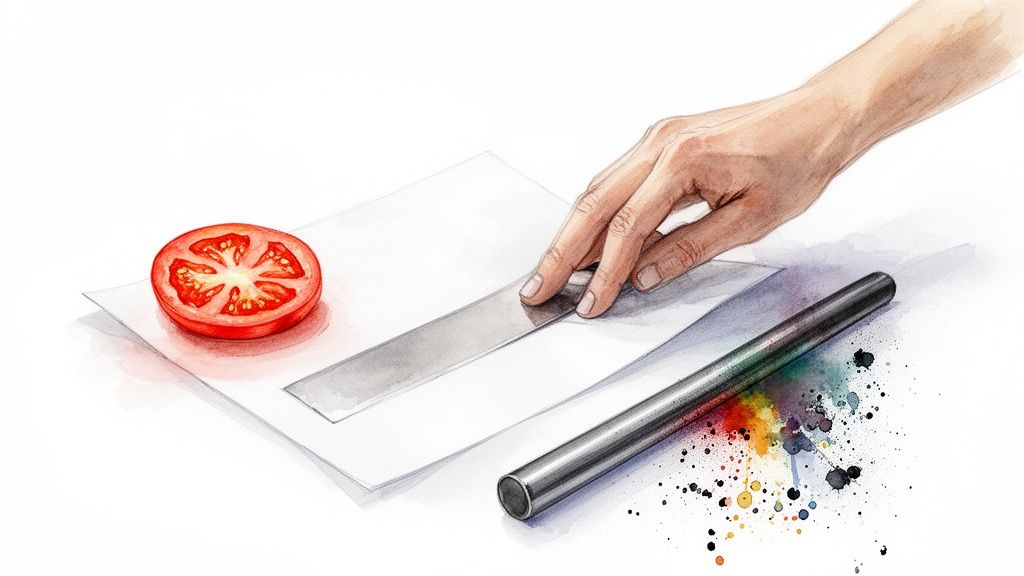
The classic paper test is my go-to starting point. Just hold up a single sheet of regular printer paper and try slicing down into the edge. A properly sharpened knife will grab the paper instantly and glide through it, leaving a clean, silent cut.
If you feel any snagging or hear a tearing sound, that's a sign your edge isn't quite uniform. You might still have a tiny burr or a few dull spots that need touching up.
The Ultimate Test: The real proof is in the produce. Grab a ripe tomato. If your knife smushes the skin and you have to force it, it's still dull. A truly sharp blade will sink through the delicate skin and flesh with barely any pressure, letting you create paper-thin slices. This is the gold standard for any chef's knife.
Keeping Your Edge with Honing
Now that you've got a killer edge, you want to keep it that way for as long as possible. This brings us to a really important distinction: sharpening vs. honing. Sharpening is an abrasive process; it actually grinds away a little bit of steel to create a brand new edge. Honing is different.
A honing steel—that long metal rod that probably came with your knife block—doesn't remove any metal. Instead, it just realigns the microscopic "teeth" on the blade's edge that get bent and pushed around during everyday use. Think of it as combing tangled hair, not cutting it.
Honing is simple. Hold the steel point-down on a cutting board. Start with the heel of your knife at the top of the steel, holding it at a shallow 15-20 degree angle. With light pressure, sweep the blade down and across the steel, pulling it toward you so you cover the entire edge from heel to tip. Do the same on the other side.
Making this a habit—just a few quick passes before you start chopping—will keep your blade performing beautifully and dramatically increase the time between actual sharpening sessions. This small routine is a game-changer for a functional kitchen, much like how a good system to make your entire cooking process smoother can save you time and frustration.
Got Questions About Sharpening? Let's Get Them Answered.
Even with the best instructions, you're bound to have a few questions when you're getting the hang of sharpening your own knives. That's perfectly normal. Let's walk through some of the most common things people ask so you can sharpen with more confidence.
So, how often should you actually be sharpening your knives? Honestly, there’s no single right answer. It really comes down to how you use them. A professional chef might touch up their main knife every week, but for most of us at home, a full sharpening session 2-4 times a year is plenty.
Forget the calendar. The best way to know it's time is to pay attention to how the knife feels. When it starts sliding off a tomato's skin instead of slicing right through, that's your cue.
Getting Into the Weeds
What about different types of blades? People often ask if they can use their regular sharpener on a ceramic knife. The short answer is almost always no. Ceramic is a much harder material than steel, and most sharpeners just aren't built for it. You’ll need a sharpener that uses a diamond abrasive to make any headway on a ceramic blade.
Another big one is the fear of grinding away too much of the blade, especially with powerful electric sharpeners. It's a smart concern to have. The trick is to always use a light touch and as few passes as possible to get the job done. Think of an electric sharpener as a tool for major edge repair, not for a quick weekly tune-up. For that, a honing steel is what you want.
The whole point of sharpening is to create a fresh, sharp edge by removing the absolute minimum amount of steel. If you’re seeing a shower of sparks or hearing a lot of heavy grinding, you’re definitely pressing too hard. Let the machine do the work.
And what about those tricky serrated knives? Can you sharpen them yourself? You bet, but it's not a job for your standard sharpener. You need a special tapered sharpening rod that fits inside each individual serration. You go one by one, which, I'll be honest, is a bit tedious. That’s why a lot of folks just send them out to a pro. Trying to use a pull-through sharpener or a flat whetstone on a serrated knife will just destroy the edge, so having the right tool is non-negotiable.
At Cooler Kitchen, we believe that the right tools make cooking more enjoyable and safe for the whole family. Explore our collection of thoughtfully designed kitchen essentials to complement your perfectly sharpened knives. Find your next favorite kitchen tool at https://www.coolerkitchen.com.