
Learn how to compost at home: Simple steps and tips
Learning how to compost at home is way easier than you might think. At its heart, it’s just the natural process of recycling your kitchen scraps and yard waste into an incredibly rich soil amendment. This simple habit doesn't just cut down on what you send to the landfill; it creates what seasoned gardeners call "black gold" for your plants—all from stuff you’d normally just throw away.
Why You Should Start Composting Today
Let's be real—the thought of starting a compost pile can feel like adding another chore to an already packed schedule. But what if it could actually make your life a little easier, cut down on stinky kitchen trash, and build a real connection between your family and the food on your table?
Turning your food scraps into rich, dark compost is so much more than just another eco-friendly task. It’s a powerful, hands-on way to make a tangible difference, starting right in your own kitchen. You're taking a direct stand against the massive global food waste problem, one apple core at a time. It’s a solution that puts you in control of your waste instead of just adding to overflowing landfills.
And the best part? Absolutely anyone can do it. It doesn't matter if you're in a high-rise apartment or a house with a huge backyard—there's a composting method that fits your life.
Your Kitchen's Impact on the Planet
Every single banana peel, scoop of coffee grounds, and handful of wilted herbs really adds up. When that organic waste gets tossed in the trash and buried in a landfill, it’s sealed off from oxygen. In that oxygen-starved environment, it rots and releases methane, a greenhouse gas that’s incredibly potent.
Home composting completely flips the script. By letting your scraps break down in an oxygen-rich compost bin, you prevent all that methane from ever being created. Instead, you’re creating a resource that actively helps the earth.
This isn't just a tiny change; it has a huge collective impact. Food waste is responsible for a staggering 8-10% of global greenhouse gas emissions, but composting at home takes a massive bite out of that number. More and more people are catching on, too. In the US alone, the amount of food and yard trimmings being composted jumped from 23.4 million tons in 2015 to 24.9 million tons by 2018. If you're curious about this growing movement, you can explore detailed market insights about home composting.
More Than Just Dirt
The payoff goes way beyond just reducing waste. Composting makes you more mindful in the kitchen, more aware of what you buy and what you toss. It’s also a fantastic, hands-on teaching tool for kids, showing them firsthand how natural cycles work.
You can even use the finished compost to grow your own food, whether it's in a big garden bed or a small windowsill herb garden. For tips on keeping those homegrown ingredients at their peak, check out our guide on the best way to store fresh herbs. This whole journey isn't about feeling guilty about waste—it's about empowerment. And it all starts with a simple bin on your counter.
Finding the Right Home Composting Method for You
So, you want to start composting? Fantastic. The first hurdle for many people is simply figuring out how. It can feel like there are a million options, but it really boils down to finding the system that fits your life, your space, and how hands-on you want to be.
Don't get bogged down thinking there's one "best" way to do it. The right method is the one you'll actually stick with. A gardener with a sprawling backyard has very different needs than someone in a third-floor apartment. Your perfect setup is out there, whether it’s a classic bin in the yard or a compact system tucked under your kitchen sink.
If you want a deeper dive, there are some truly amazing methods of composting to explore, each with its own quirks and benefits.
But really, getting started is as simple as this:
If you've got food scraps, you've got everything you need to begin.
To help you find your perfect match, let's break down the four most popular home composting methods.
Which Composting Method Is Right for You?
| Method | Best For | Effort Level | Time to Finish | Key Benefit |
|---|---|---|---|---|
| Cold Composting | Beginners with a backyard who value simplicity over speed. | Low | 1-2 years | "Set it and forget it" approach. |
| Hot Composting | Avid gardeners who want fast, high-quality compost. | Medium-High | 4-12 weeks | Kills weed seeds and pathogens. |
| Vermicomposting | Apartment dwellers and small-space gardeners. | Low-Medium | 2-3 months | Produces nutrient-rich worm castings. |
| Bokashi | Anyone wanting to compost all food waste (meat, dairy). | Low | 2-6 weeks | No-smell fermentation for tricky scraps. |
Each of these has its place. The key is to be realistic about your space and the time you're willing to commit. Now, let’s look a little closer at what makes each one tick.
For the Backyard Gardener: Hot and Cold Composting
If you're lucky enough to have some outdoor space, your options open up quite a bit. The two classic backyard methods are cold and hot composting. They sound similar, but they're worlds apart in terms of process and results.
Cold Composting: The "Set It and Forget It" Approach
This is composting at its most relaxed. You simply create a pile or use a bin, tossing in kitchen scraps, leaves, and grass clippings as they come. There’s no need to worry about ratios, turning, or temperature checks. You just let nature do its thing.
- Who it’s for: Anyone with a yard who wants an ultra-low-effort way to reduce waste and isn't in a rush for finished compost.
- The effort: Next to none. Just add materials and walk away.
- The timeline: It's a slow burn. Expect usable compost in 1 to 2 years.
The main tradeoff for this simplicity is that the pile never heats up, meaning weed seeds and some plant diseases might survive the process. But if easy is your top priority, you can't beat it.
Hot Composting: The Active, Faster Method
For those who want rich, black gold for their garden this season, hot composting is the way to go. This method is more involved because you're actively managing the pile to create the perfect conditions for heat-loving microbes. When you get it right, the core can reach a steamy 130°F to 160°F.
That heat is the secret sauce. It turbocharges the decomposition process and is hot enough to neutralize most pesky weed seeds and pathogens. The trick is maintaining a good balance of "green" (nitrogen-rich) and "brown" (carbon-rich) materials and turning the pile every week or two to keep it aerated.
- Who it’s for: Gardeners who crave a steady supply of top-tier compost and don't mind a bit of a weekend workout.
- The effort: Moderate. You'll need to turn the pile and keep an eye on moisture levels.
- The timeline: Much, much faster. You can have finished compost in as little as 4 to 12 weeks.
For Small Spaces and Apartments: Vermicomposting and Bokashi
Think you can't compost without a yard? Think again. A couple of brilliant, modern methods are designed specifically for indoor use, proving that anyone can turn their scraps into something amazing.
"Many people worry that it will smell or attract pests, but if you do it correctly, it won’t. Well-made compost has a rich, earthy smell and looks like very dark soil."
Vermicomposting: Harnessing the Power of Worms
Don’t let the fancy name intimidate you—vermicomposting is just composting with worms. Using a special tiered bin, a colony of red wiggler worms will happily and efficiently process your fruit and vegetable scraps.
These little guys are recycling powerhouses, turning waste into "worm castings," a super-concentrated, nutrient-dense soil amendment that plants absolutely love. A well-managed worm bin is completely odorless and can be a fascinating little ecosystem to have in your home, garage, or on a balcony.
- Who it's for: Apartment dwellers, container gardeners, and anyone who wants the highest quality compost imaginable.
- The effort: Low to moderate. Feed the worms every few days and make sure their bedding stays moist.
- The timeline: Pretty quick! You can start harvesting castings in about 2 to 3 months.
Bokashi: The Fermentation Method
Bokashi is the rebel of the composting world because it’s not really composting at all—it’s fermentation. You use an airtight bucket and a special bran inoculated with microbes to essentially pickle your kitchen waste. The process is anaerobic (oxygen-free), which means no foul odors.
Its biggest selling point? You can toss in things that are a no-go for other systems, like meat, cheese, and oily foods. After about two weeks, the fermented material, or "pre-compost," needs to be buried in soil—either in a garden bed or a large planter—to finish breaking down.
- Who it's for: People who want to divert all of their food waste from the landfill and have a spot to bury the final product.
- The effort: Low. Just layer your scraps with the bran, press them down, and seal the lid.
- The timeline: Super fast. Fermentation takes about 2 weeks, followed by another 4 weeks in the soil to fully decompose.
Getting the Recipe Right: The Magic of Greens and Browns
The secret to great compost isn’t some complex scientific formula—it's more like a simple recipe. Think of your compost pile as a living thing. To keep it healthy and working hard, you need to feed it a balanced diet.
This balance comes down to two key ingredients: "Greens" and "Browns." Get the mix right, and you’ll have a happy, healthy pile that breaks down quickly without any bad smells. Get it wrong, and you might end up with a slimy, stinky mess or a dry, dormant heap that does absolutely nothing.
The Roles of Greens and Browns
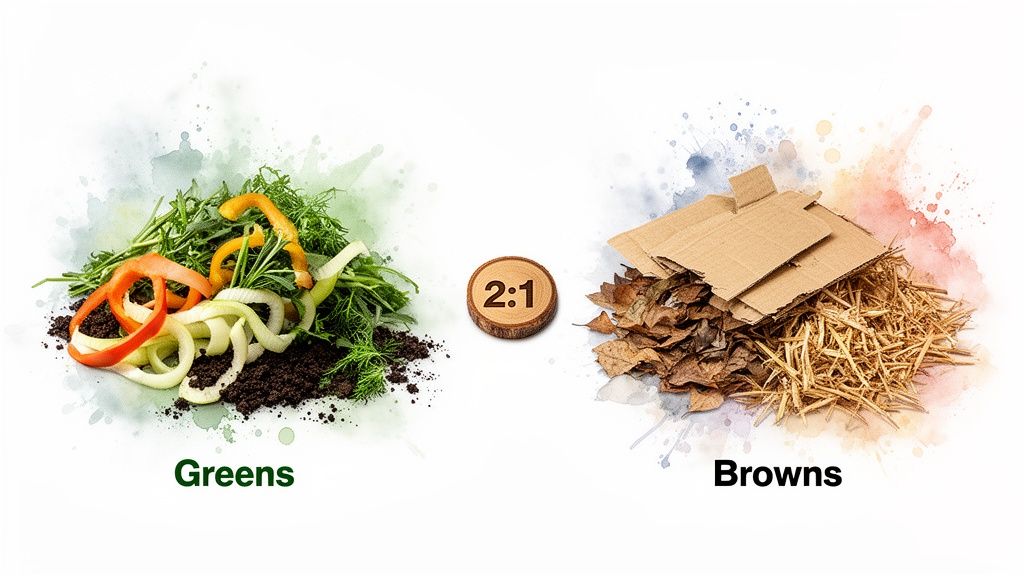
At its heart, composting is about managing carbon and nitrogen. But to keep things simple, we just call them Browns (for carbon) and Greens (for nitrogen).
Greens are the "hot" ingredients. They're full of nitrogen and moisture, providing the protein that gets microorganisms fired up and multiplying. Think of them as the gas pedal for your compost pile.
Browns are the "slow" ingredients. These dry, carbon-rich materials are the microbes' main energy source. Just as important, they provide structure, creating air pockets that keep the pile from becoming a compacted, oxygen-starved sludge.
The rule of thumb I always follow is to aim for roughly two to three parts Browns for every one part Greens by volume. It's not an exact science, but it's a fantastic starting point. If you have too many Greens, your pile will get stinky. Too many Browns, and it'll take forever to break down.
A good habit is to cover every bucket of kitchen scraps (Greens) with two or three handfuls of shredded leaves or cardboard (Browns).
What Counts as a "Green"
Green materials are the fresh, vibrant, and often wet stuff you add to your bin. They're the activators that really get the decomposition process humming.
Here are some of the best Greens you'll find around your home:
- Fruit & Veggie Scraps: Apple cores, banana peels, onion skins, sad-looking lettuce—these are the foundation of most home compost systems.
- Coffee Grounds & Tea Bags: Coffee grounds are a powerhouse of nitrogen. Just remember to snip the staple off the tea bag if it has one.
- Fresh Grass Clippings: A fantastic nitrogen source, but add it in thin layers. If you dump a thick mat of fresh grass, it will turn into a slimy mess.
- Eggshells: A great source of calcium for your future garden. I always crush them up so they break down faster.
- Plant Trimmings: Freshly pruned leaves from houseplants or green garden clippings are perfect.
The most common mistake I see is a bin overloaded with kitchen scraps and nothing else. That high-nitrogen, high-moisture mix is practically guaranteed to create a foul odor.
What Counts as a "Brown"
Browns are the dry, carbon-rich materials that balance everything out. People often think they're hard to come by, but once you start looking, you'll find them everywhere.
These are my go-to Browns:
- Dry Leaves: The absolute gold standard. I gather a few bags every autumn and keep them next to my compost bin to use all year long.
- Shredded Cardboard & Paper: Amazon boxes, newspaper, and paper bags are a fantastic, readily available source. Just rip them into small pieces.
- Wood Chips & Sawdust: Great, but use them sparingly as they decompose very slowly. Make sure it's from untreated wood.
- Straw or Hay: Excellent for adding bulk and creating airflow if you can get your hands on some.
- Paper Egg Cartons & Toilet Paper Rolls: These are easy to tear up and provide a quick dose of carbon.
Keeping a stockpile of Browns nearby is the single best tip for hassle-free composting. It makes it easy to balance your pile every time you add food scraps.
What to Keep Out of Your Home Compost Bin
Knowing what not to compost is just as crucial as knowing what to add. Some things will attract pests, create nasty smells, or introduce things you don't want in your garden. A small-scale home compost pile just doesn't generate enough heat to safely handle them.
Here's a clear list of what to leave out:
| Item to Avoid | Why You Should Avoid It |
|---|---|
| Meat, Fish, and Bones | These putrefy, creating awful odors that are a dinner bell for rodents and other critters. |
| Dairy Products (Milk, Cheese, Yogurt) | Like meat, dairy spoils quickly, attracts pests, and smells terrible in the process. |
| Oils, Fats, and Greasy Foods | Oils create a water-resistant barrier on other materials, slowing down decomposition and throwing off the moisture balance. |
| Diseased Plants or Weedy Seeds | Your pile likely won't get hot enough to kill plant pathogens or stubborn weed seeds, meaning you could end up spreading them right back into your garden. |
| Pet Waste (Dog or Cat Feces) | Waste from meat-eating animals contains parasites and pathogens that can be harmful to humans and are not reliably killed in a home compost system. |
| Coal or Charcoal Ash | This contains sulfur and iron in amounts that can damage your plants. |
Stick to this basic recipe—balancing your Greens and Browns while avoiding the no-go items—and you'll be well on your way. You're creating the perfect environment for an army of microbes to turn your scraps into the rich, dark "black gold" that will make your garden thrive.
Getting Your Compost System Up and Running
Alright, this is where the magic really starts. Whether you’ve got a simple pile in the backyard or a fancy countertop unit, setting it up right is your chance to build the perfect environment for all that amazing decomposition to happen. I like to think of it less as a chore and more like building a tiny, super-efficient ecosystem right at home.
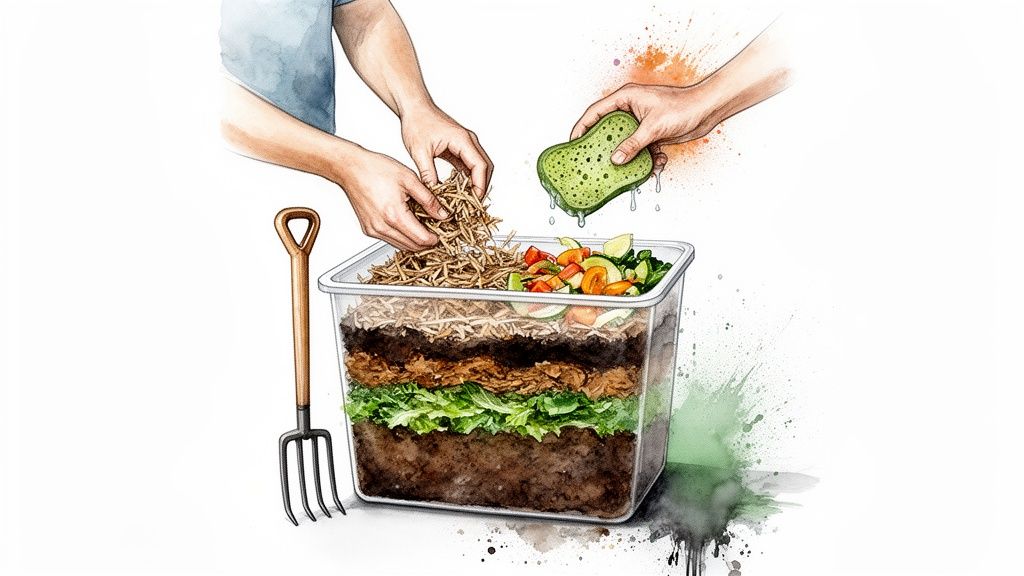
The foundation is everything. If you're starting an outdoor pile or filling a bin, you'll want to begin with a layer of coarse, bulky browns. Think twigs, small branches, or even just torn-up cardboard. This first layer, about four to six inches thick, is your secret weapon for good airflow, preventing the whole thing from turning into a soggy, compacted mess.
Building Your First Layers
Once you have that base down, it's time to start adding your kitchen scraps and yard trimmings. The key is to follow that crucial recipe of greens and browns. I always add a layer of greens—like kitchen scraps or fresh grass clippings—and then immediately cover it with a layer of browns that’s about two or three times bigger.
For example, if I dump in a small bucket of vegetable peels and coffee grounds, I’ll follow it up with three buckets of shredded dry leaves. This layering trick is the easiest way I’ve found to keep that carbon-to-nitrogen ratio balanced from day one. I even keep a bale of straw right next to my composter just to make this step a no-brainer.
For smaller indoor setups, the process is even more straightforward. A simple countertop container, like this odor-free kitchen compost bin, makes it easy to collect scraps throughout the day before they head to the main event.
Your Weekly Maintenance Routine
Good composting is all about simple, consistent habits. You don't need to babysit your pile for hours; just a few minutes a week is all it takes to keep things humming along. The two things you absolutely need to stay on top of are turning it and checking the moisture.
Turning your compost, also known as aeration, is like giving all those hardworking microbes a fresh breath of air. It’s what stops bad smells in their tracks, spreads moisture and nutrients around, and keeps the temperature just right.
- For outdoor piles or bins: Grab a garden fork or a compost aerator once a week and give it a good mix. The goal is to move the cooler outer layers into the hot center.
- For compost tumblers: Just give the handle five to ten solid cranks every few days. This is the biggest perk of a tumbler—aeration is fast and totally clean.
This regular mixing is what makes the difference between a slow, passive pile and an active, hot compost system that gives you finished compost in weeks instead of years.
A healthy compost pile should feel like a wrung-out sponge—moist to the touch, but not dripping wet when you squeeze a handful. This simple test is the most reliable way to check moisture levels.
If it feels dry and crumbly, just give it a quick spray with a hose. If you find it’s overly wet and slimy, mix in more dry browns like shredded paper or sawdust to soak up that extra moisture.
Getting the Whole Family Involved
Composting can be a fantastic family activity, and it’s a great way to build a lasting habit. Kids are usually fascinated by watching food scraps turn into soil. You can get them involved with simple, age-appropriate jobs.
- Younger kids are great at tearing up cardboard for the browns pile or collecting and crushing eggshells.
- Older kids can help carry the kitchen bin out to the main composter and can even get in on the action of turning the pile.
When everyone has a role, it becomes a fun, shared project about nature and sustainability. We're seeing a huge demand for convenient, family-friendly options. In fact, electric composters captured 63% of the market share recently, and that market is expected to grow from USD 483.5 million to USD 881.4 million by 2034. It's a clear sign that people are looking for faster, more automated solutions to make composting easier than ever.
Troubleshooting Common Composting Problems
Even the most experienced composters run into a snag every now and then. The key is to think of your compost pile less like a project you can fail at and more like a living thing. When something goes wrong, it's just the pile's way of telling you it needs something.
Don't let a weird smell or a sluggish pile discourage you. These issues are almost always a simple fix. With a little detective work, you'll have things back on track in no time, and you'll be that much more confident in making your own "black gold."
My Compost Has a Foul Smell
This is, by far, the most common worry, but it's also one of the easiest to fix. A healthy compost pile should have a rich, earthy smell, like a forest floor after a good rain. If you're smelling something sour, rotten, or like ammonia, your pile is out of balance.
The Problem: The culprit is almost always too much nitrogen-rich "green" stuff (like kitchen scraps) and not enough air. When wet greens get packed down without enough "browns" to create air pockets, they go anaerobic. That lack of oxygen invites the wrong kind of microbes to the party, and they produce some seriously stinky gases.
The Solution:
- Add More Browns: The immediate fix is to mix in a generous amount of carbon-heavy materials. Think shredded cardboard, dry leaves, or torn-up newspaper. As a rule of thumb, you want at least twice as much brown material as green.
- Turn and Aerate: Grab a pitchfork and give the whole pile a good flip. This breaks up any dense, wet clumps and gets oxygen flowing, which helps the good, non-stinky microbes take over.
- Bury Your Scraps: Going forward, make a habit of digging a little hole in the center of your pile for new food scraps. Then, cover them up completely with a layer of browns.
For those using a countertop bin, a lingering odor is often a sign that your filter needs changing. You can usually find affordable compost bin replacement filters that work wonders for keeping kitchen smells at bay.
Unwanted Pests Have Moved In
Finding some critters in your compost is totally normal—and even a good sign! Worms, soldier fly larvae, and centipedes are all part of the decomposition dream team. It's when you start seeing pests like ants, swarms of fruit flies, or larger animals like raccoons and rodents that you need to take action.
Many people worry that it will smell or attract pests, but if you do it correctly, it won’t. A well-made compost pile is a deterrent, not an invitation.
The Solution:
- Bury Food Deep: Rodents are looking for an easy meal. Always bury your kitchen scraps deep in the center of the pile, making sure they're covered by at least a few inches of other material.
- Check Your Moisture Levels: An overly dry pile is a perfect home for an ant colony. If you see them moving in, give the pile a light watering. On the flip side, fruit flies are drawn to excess moisture, so if they're buzzing around, mix in more dry browns to soak it up.
- Stick to the "Vegan" Diet: Never add meat, bones, dairy, or greasy foods to a typical home compost pile. These are magnets for all the pests you don't want.
My Pile Isn't Breaking Down
Is your compost pile just… sitting there? If weeks have gone by with no noticeable change, it's not dead—it's just dormant. It’s likely missing one of its essential ingredients to get the decomposition engine running again.
The Problem: A stalled pile almost always comes down to two things: it's either too dry, or it's starving for nitrogen (meaning it has too many browns).
The Solution:
- Do the Squeeze Test: This is the easiest way to check for moisture. Grab a handful of compost and squeeze it hard. It should feel like a wrung-out sponge, releasing just a drop or two of water. If it’s dry and crumbly, give it a good spray with the hose as you turn it.
- Feed It Some Greens: If the pile is moist enough but still cold and inactive, it needs a nitrogen kick. Mix in some fresh "greens" like grass clippings, coffee grounds, or a new batch of vegetable scraps to wake up the microbes.
- Chop Things Smaller: Remember, smaller pieces break down faster. If your pile is full of whole broccoli stalks or thick, matted layers of leaves, breaking them up with a shovel or pitchfork can make a huge difference and speed things along.
How to Harvest and Use Your Finished Compost
This is the moment you’ve been waiting for—the payoff for all your hard work and patience. After a few months, you’ll look inside your bin and find that the jumble of kitchen scraps and yard trimmings has transformed into something magical.
You’ll know your compost is ready when it’s dark, crumbly, and smells wonderfully earthy, just like the forest floor after a good rain. At this point, you shouldn’t be able to recognize much of what you originally threw in. It should have a mostly uniform, soil-like texture.
If you’re not quite sure, try the "bag test." Just seal a handful of your compost in a plastic bag for a couple of days. When you open it, an earthy scent means you’re good to go. If it smells sour or ammonia-like, the microbes still have some work to do, so give it a bit more time.
Getting the Good Stuff Out
Harvesting is pretty straightforward, especially if you have a two-chamber tumbler or a multi-bin system. These setups are great because you can let one side "finish" cooking while you keep adding fresh material to the other.
For a single pile or bin, you have two options. You can either empty the whole thing and start fresh, or you can carefully dig the finished compost out from the bottom, leaving the newer material on top to continue breaking down.
You'll almost certainly find a few stubborn items that haven't fully decomposed, like avocado pits or chunky twigs. The easiest way to deal with these is to sift your compost.
- Build or buy a sifter: A simple wooden frame with ½-inch hardware cloth stapled across it works perfectly. You can also find ready-made compost sifters online or at garden centers.
- Shake it through: Place your sifter over a wheelbarrow or a tarp and shovel the compost on top. A little shake is all it takes.
- Sort it out: The fine, finished compost will fall through, ready for use. Just toss the larger pieces that get left behind right back into your active pile to give them another round.
Putting Your Black Gold to Work
Now for the fun part: using your homemade "black gold" to feed your plants. This stuff is so valuable that the global compost market grew from $6.82 billion in 2022 to $7.4 billion in 2023. You can read more about the incredible growth in the household food waste composting market.
Finished compost is so much more than just a fertilizer. It’s a soil conditioner, a moisture regulator, and a microbial powerhouse all in one. It improves your soil’s structure and gives your plants the foundation they need to thrive.
Here are just a few ways to use your finished compost:
- Enrich Potting Mix: Give your houseplants or windowsill herb garden a serious boost. Blend one part compost with about two parts potting soil.
- Top-Dress Your Lawn: In the spring or fall, spread a thin layer (about a quarter-inch) over your grass. It acts as a fantastic, natural slow-release fertilizer.
- Supercharge Garden Beds: Before planting your vegetables or flowers, work a few inches of compost into the top layer of your soil. Your plants will thank you for it all season long.
Your Composting Questions, Answered
Once you get started with home composting, you'll inevitably run into a few real-world questions. Getting these sorted out early will keep you on track and make the whole process feel like second nature.
Can I Keep Composting in the Winter?
You bet. Just because it’s cold outside doesn’t mean you have to stop. Your outdoor compost pile will definitely slow down when the temperature drops, but the microbes are still in there, just dormant.
Keep adding your kitchen scraps all winter long. Think of it as stockpiling ingredients. When spring rolls around and things warm up, all that material will be ready to break down in a hurry. If you want to give it a little help, you can insulate the pile with a thick layer of straw or cover it with a dark tarp to trap some solar heat.
How Do I Keep Fruit Flies Out of My Kitchen Bin?
Ah, the dreaded fruit flies. They’re annoying, but thankfully, they’re also pretty easy to outsmart. It all comes down to cutting them off from their food source.
- Lid on, always. Make sure your countertop compost container has a tight-fitting lid and keep it closed.
- Take out the trash. Empty that kitchen bin into your main pile or bin every day or two. Don't let scraps sit around.
- Bury the goods. This is the big one. Every time you add new food scraps, cover them with a layer of "browns" (like shredded newspaper or fall leaves). This goes for your small kitchen caddy and your big outdoor system.
Honestly, the best defense is a good offense. A clean bin with buried scraps makes your kitchen a total no-fly zone for these pests.
For a deeper dive into the science and practice of composting, this complete guide to compost is a fantastic resource.
Ready to make composting an effortless part of your routine? The Cooler Kitchen countertop compost bin is designed for modern, odor-free convenience. Start turning your kitchen scraps into black gold today by visiting https://www.coolerkitchen.com.