
Simple Homemade Ice Cream Recipes You Can Actually Make
Forget everything you think you know about making ice cream at home. This isn't about fussy gadgets or hard-to-find ingredients. It's about creating unbelievably fresh, creamy desserts with just a few simple things you probably already have, giving you total control over every single scoop.
Why Bother Making Ice Cream at Home?
Imagine serving your family a bowl of rich, velvety dessert made with real cream and vanilla bean, or maybe a vibrant sorbet that tastes like you just picked the berries yourself. That's the magic of homemade. We're going to skip the weird artificial additives and the eye-watering cost of those fancy store-bought pints and make something truly special.
And the best part? You absolutely do not need to be a pastry chef to get incredible results.
This whole movement toward making frozen treats at home isn't just a fad. More and more, health-conscious families are ditching the tubs full of preservatives for simple homemade ice cream recipes that rely on fresh, wholesome ingredients. You can see this shift happening in the appliance aisle, too.
Your Kitchen, The Best New Ice Cream Shop
The global market for household automatic ice cream makers is exploding. It was valued at an incredible $10,511.86 million in 2025 and is only expected to keep growing. Why? Because people want to know exactly what's in their food.
Plus, it's way cheaper. Once you have a machine, making your own ice cream can cut your costs by up to 50% per serving compared to buying it. If you want to dive into the numbers, you can explore the full market research on household ice cream makers.
This guide will walk you through the essential methods, giving you the confidence to turn your kitchen into the best ice cream parlor on the block. We’ll get into:
- Foolproof No-Churn Recipes: The perfect starting point. No special equipment needed, just creamy, delicious results.
- Classic Custard Bases: This is for when you're chasing that ultra-premium, velvety texture you find in artisanal shops.
- Dairy-Free Sorbets: You'll learn how to whip up incredibly refreshing treats with fresh fruit and just a couple of other ingredients.
Once you get the hang of a few basic techniques, a whole world of flavor combinations opens up. The real magic hits when you realize a fantastic frozen dessert is only a few ingredients and a little bit of time away.
From start to finish, the whole process is just so rewarding. Not only do you get a dessert that tastes worlds better than anything from a carton, but you also get the satisfaction of knowing you made it yourself. For more great ideas on how to make homemade ice cream, our detailed guide has you covered.
Your First Recipe: The No-Churn Method
So, you’re ready to dive into making your own ice cream? Let's start with the absolute easiest and, frankly, most magical method out there: no-churn. This is where your journey begins, and it's a game-changer. You can get incredibly creamy, rich, scoopable ice cream without any special equipment. No machine, no problem.
The secret lies in a brilliant combination of two powerhouse ingredients. You have sweetened condensed milk, which brings the sugar, richness, and a silky-smooth body to the party. Then you have whipped heavy cream, which gets beaten to stiff peaks, trapping air inside to create that light, fluffy texture that churning normally provides. It’s a genius shortcut that really works.
Understanding The Key Ingredients
The whole process is delightfully simple. You start by whipping very cold heavy cream until it holds its shape. Getting those stiff peaks is what keeps your final product from turning into a solid, icy brick.
Next, you gently fold in the sweetened condensed milk and your flavorings—a splash of pure vanilla extract is a classic for a reason. The trick is to be gentle; you worked hard to get all that air into the cream, and you don't want to knock it out now!
Deciding where to start can be the biggest hurdle for any home cook, but it really just comes down to what tools you have on hand.
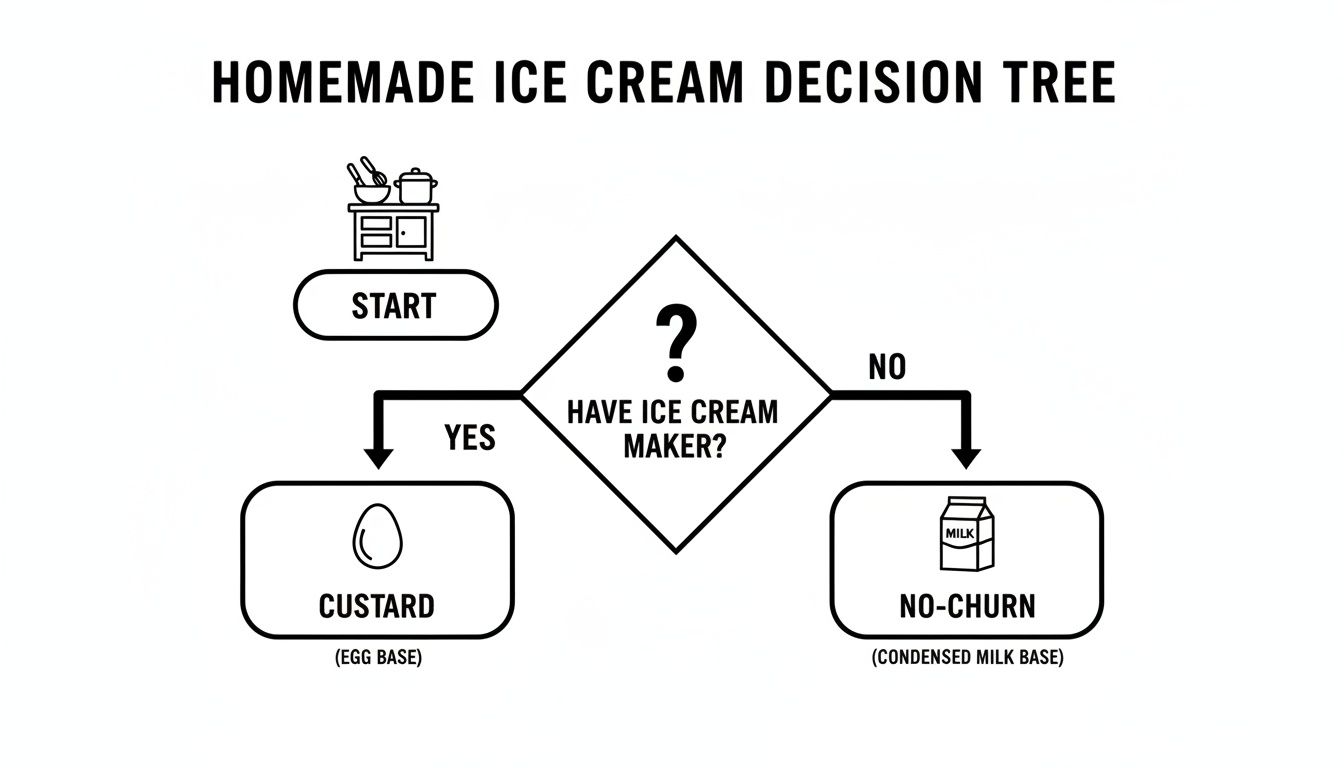
As you can see, the path you take depends entirely on whether you have an ice cream maker. That’s exactly why the no-churn method is such a fantastic and accessible starting point for literally everyone.
Getting Creative with Mix-Ins
While a classic vanilla is heavenly on its own, think of this no-churn base as your blank canvas. The real fun starts when you begin adding mix-ins just before you pop it in the freezer.
Here are a few simple ideas to get you started:
- Classic Treat: Gently fold in a handful of crushed chocolate sandwich cookies or chopped chunks of your favorite chocolate bar.
- Decadent Swirl: Drizzle in some salted caramel sauce or melted peanut butter, then give it just a couple of stirs to create those beautiful ribbons of flavor.
- Fruity Twist: Add a thick berry compote or your favorite jam. Just make sure it’s completely cooled down first!
My biggest piece of advice here is to add your mix-ins at the very end and fold them in gently. If you overmix, they’ll sink to the bottom, and you’ll lose that light texture. A light hand is key to preserving both the texture and the swirls.
This method is more than just a recipe; it's an incredibly rewarding kitchen project. In fact, you can find even more inspiration for fun recipes to make with kids that get the whole family involved. Its simplicity makes it perfect for a lazy summer afternoon.
Creating a Rich Custard-Style Ice Cream
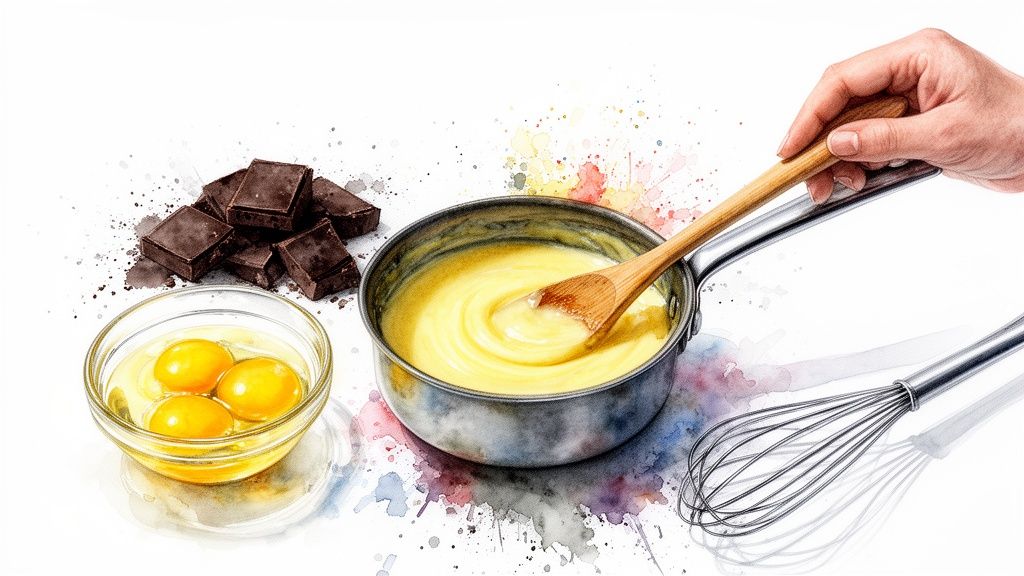
If you're after that next-level, velvety texture you find in high-end ice cream shops, the classic custard method is the way to go. It’s often called French-style, and while it does involve cooking a base with egg yolks, the process is way less intimidating than it sounds. The reward is a sublime richness that’s absolutely perfect for deep flavors like dark chocolate or a robust coffee.
The secret here is using egg yolks as a natural emulsifier, a technique with deep culinary roots. It’s what gives this ice cream its incredibly smooth mouthfeel. Over the years, simple homemade ice cream recipes evolved from these classic European custards into the simpler, no-cook versions many of us know today. But for true texture aficionados, the original remains the gold standard, and it's a big reason why the global ice cream market is now worth $115.08 billion. You can get more insights on the global ice cream market on stellarmr.com.
The Art of Tempering Eggs
The single most important step in making a custard base is tempering the egg yolks. It sounds fancy, but all it means is slowly raising the temperature of the eggs so they don't turn into scrambled eggs when you mix them with the hot cream. Rushing this is the number one mistake people make, and it's an easy one to avoid.
Here’s how you get it right. First, heat your milk, cream, and sugar in a saucepan until it’s hot and steaming—don’t let it boil. While that’s warming up, whisk your egg yolks in a separate bowl until they’re pale and slightly thickened. Now for the magic: slowly ladle a small amount of the hot cream mixture into the yolks while whisking constantly. Add one more ladleful, still whisking, then pour the now-warmed egg mixture back into the saucepan with the rest of the cream.
Cooking the Custard to Perfection
With everything combined back in the saucepan, you'll cook the base over medium-low heat. The key here is to stir constantly with a wooden spoon or a heat-proof spatula. You're aiming to thicken the custard just enough so it coats the back of a spoon.
So, how do you know when it’s ready? It's a classic kitchen test:
- Dip your spoon into the custard.
- Lift it out and run your finger across the back.
- If the line your finger creates holds its shape and doesn't immediately fill in, you're done.
This usually takes about 10 minutes, so patience is your friend. Keep that heat low and steady; if it boils, the custard can curdle and ruin the texture.
My most critical pro-tip is to always strain your finished custard through a fine-mesh sieve into a clean bowl. This little step is your insurance policy. It catches any tiny bits of cooked egg that might have snuck in, guaranteeing your final ice cream is flawlessly smooth.
After straining, the base needs to be chilled completely. I mean completely. I always chill mine overnight in the refrigerator. This not only lets the flavors deepen and meld but also ensures the base is cold enough for your electric ice cream maker to do its job properly. A thoroughly chilled base is non-negotiable—it's what prevents ice crystals and gives you that signature creamy, professional-quality scoop right in your own kitchen.
Sorbets and Healthier Frozen Treats
Sometimes, you want a frozen treat that’s more on the refreshing side—something light, bright, and not weighed down by cream and sugar. This is where sorbets and other healthier alternatives really shine. They're perfect for anyone who's dairy-free or just wants a scoop of something a little less indulgent.
The best part about making these at home? You're in complete control. That's a huge reason why the home-use ice cream maker market is projected to hit $1,257.74 million by 2029. You can easily swap in almond milk for a family member with lactose intolerance (which affects about 65% of people worldwide) or dial back the sugar to keep things clean. People are catching on to the fact that homemade means healthier.
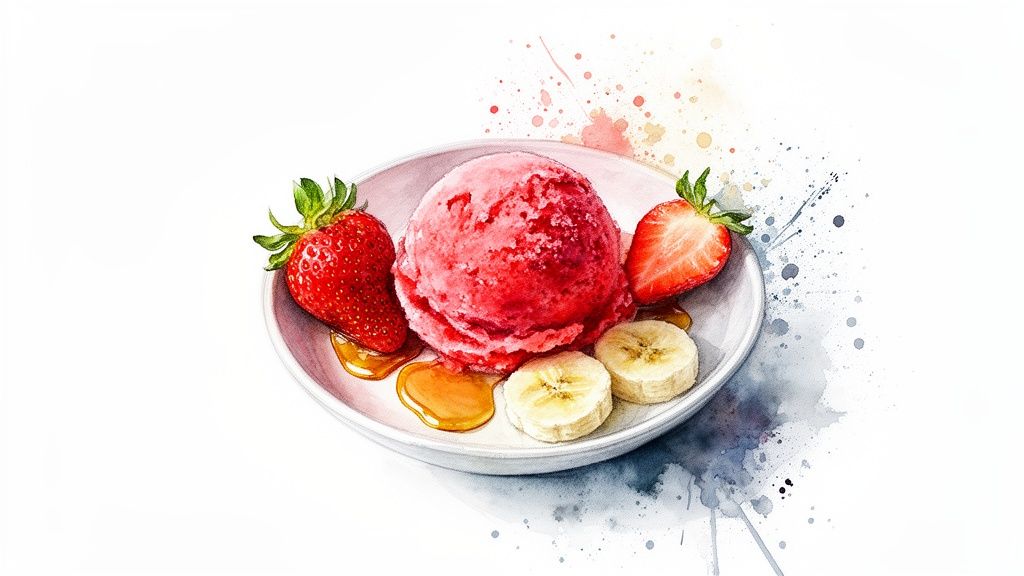
Making a Simple 3-Ingredient Strawberry Sorbet
Sorbet is simplicity at its best. For a foolproof strawberry sorbet that tastes like pure sunshine, you only need three things. It's truly one of the best simple homemade ice cream recipes for letting peak-season fruit do all the talking.
What You'll Need:
- Strawberries: About a pound (16 ounces), fresh or frozen.
- Simple Syrup: Just mix equal parts sugar and water, heat until dissolved, and let it cool completely. A half-cup is a great starting point.
- Lemon Juice: A tablespoon is all it takes to make the strawberry flavor pop.
Just blend everything until it's completely smooth, get the mixture really cold in the fridge, and then let your ice cream maker do the work. You’ll end up with a vibrant, intensely fruity sorbet that’s impossible to resist.
The Magic of Banana "Nice Cream"
Another fantastic healthy option is what people call "nice cream," and it's built on the magic of frozen bananas. When you blend ripe, frozen bananas, they break down into an amazingly creamy, soft-serve-like base without a drop of dairy or added sugar. It’s naturally sweet and has a texture that’s hard to believe.
Once you have the banana base, the sky's the limit. Toss in a spoonful of cocoa powder for a chocolatey version, a scoop of peanut butter for a protein kick, or more frozen fruit like mangoes or cherries. It's an incredibly forgiving recipe and a huge hit with parents.
Trying to get a little extra nutrition into your kids' snacks? There are some brilliant hacks to hide veggies in picky eaters' meals that you can even adapt for frozen treats.
Whether you go for a zesty sorbet or a creamy "nice cream," these recipes prove you don't need a lot of fuss to make a delicious frozen dessert. If you're looking for more ways to beat the heat, check out our guide to making https://www.coolerkitchen.com/blogs/cooler-kitchen-blog/farewell-summer-i-salute-you-with-one-final-ice-pop.
Working Out the Kinks: Troubleshooting Your Homemade Ice Cream
Even with the most straightforward recipe, things can go a little sideways. Don't worry, it happens to all of us. The great news is that most common ice cream problems are surprisingly easy to fix once you know what's going on behind the scenes.
The number one complaint I hear is about a grainy or icy texture. This is almost always a result of large ice crystals forming while the ice cream freezes. The usual suspects? Either the ice cream base wasn't cold enough before it hit the machine, or the freezer bowl itself wasn't frozen solid. Seriously, don’t rush these steps—they are everything when it comes to getting that perfectly smooth texture.
Make sure to chill your base in the coldest part of your fridge for at least four hours, though overnight is truly ideal. As for the freezer bowl from your Cooler Kitchen ice cream maker, it needs a solid 24 to 48 hours tucked away in the very back of your freezer. If you give it a little shake and hear any sloshing liquid, it's not ready yet. Pop it back in and give it more time.
Why Is My Ice Cream Icy?
Beyond getting everything properly chilled, the ingredients themselves are your secret weapon against iciness. The fat in the cream and egg yolks, along with the sugar, actively gets in the way of large ice crystals forming. This is precisely why following a recipe’s proportions is so critical—that balance is what delivers the creaminess we’re all after.
Here are a few tricks I’ve picked up over the years for an even smoother, softer scoop:
- A little booze goes a long way. Just a tablespoon of a neutral spirit like vodka can make a huge difference. Alcohol freezes at a much lower temperature, which keeps the final product softer and easier to scoop straight from the freezer.
- Swap some sugar. Try replacing a small portion of the sugar with corn syrup, glucose, or honey. These are known as "invert sugars," and they're fantastic at preventing crystallization and improving the overall texture.
- Know when to stop churning. You want to churn the ice cream just until it looks like thick, soft-serve. If you let it go too long, you risk breaking down the delicate structure you've worked so hard to build.
If you remember only one thing, make it this: the colder your base and the colder your freezer bowl, the faster your ice cream will churn. Faster churning means smaller ice crystals, which is the ultimate secret to incredibly creamy homemade ice cream.
Keeping It Fresh: How to Store Your Ice Cream
Once you’ve churned a perfect batch, your job isn't quite done. Proper storage is key. Homemade ice cream doesn’t have the commercial stabilizers that give store-bought pints their long shelf life, so it's more susceptible to freezer burn and textural changes.
To keep your creation in peak condition, get it out of the churning bowl and into an airtight container right away. Here's the pro move: press a small piece of plastic wrap or parchment paper directly onto the surface of the ice cream before putting the lid on. This simple barrier is the best defense against ice crystals forming on top, ensuring your dessert stays fresh and creamy for up to two weeks.
Answering Your Homemade Ice Cream Questions
Making ice cream at home is a blast, but let's be honest—things can go sideways. It’s part science, part art, and a few common issues can frustrate anyone. I've been there! Here are the answers to the questions I hear most often, designed to get you past any hurdles and back to the fun part: eating.
We'll tackle everything from texture problems to how long your delicious creation will actually last in the freezer.
Why Is My Homemade Ice Cream Icy Instead of Creamy?
This is the number one problem people run into. That dreaded gritty, icy texture is almost always caused by large ice crystals forming as your ice cream freezes. The goal for unbelievably creamy ice cream is to keep those crystals tiny.
So, what's going wrong? Usually, it's one of two things. First, the ice cream base wasn't cold enough when it went into the machine. You really need to chill it for at least four hours, though I find that leaving it in the fridge overnight gives the best results. Second, the freezer bowl for your ice cream maker wasn't frozen solid. Don't rush this step! Give it a full 24 hours in the coldest spot in your freezer to make sure it’s ready to go.
Here's a little secret from experience: fat and sugar are your best friends in the fight against iciness. They get in the way of ice crystal formation, which is why following a recipe's ratios is so important for getting that perfect, scoopable texture.
Can I Reduce the Sugar in These Recipes?
You can, but you'll notice a difference. Sugar isn't just for sweetness; it’s a workhorse ingredient that's crucial for texture. It actually lowers the freezing point of your ice cream base, which is what keeps the final product soft enough to scoop instead of turning into a solid block of ice.
If you cut the sugar too much, you'll end up with a much harder, icier dessert. For a great-tasting, lower-sugar option, try making "nice cream" with super-sweet frozen bananas as a base. You could also explore sugar substitutes made specifically for frozen desserts. A small reduction is usually okay, but just be ready for a firmer result.
How Long Does Homemade Ice Cream Last?
For the best possible taste and texture, try to enjoy your homemade ice cream within about two weeks. Unlike the stuff you buy at the store, which is packed with stabilizers, the homemade version is more natural and will start to develop ice crystals or absorb weird freezer smells over time.
Proper storage is everything.
- Pick the right container: I always use a shallow, airtight container. It helps the ice cream freeze faster (which means smaller ice crystals) and keeps air out.
- Add a protective layer: Before you pop the lid on, press a piece of plastic wrap or parchment paper directly onto the surface of the ice cream. This little trick is a game-changer for preventing ice crystals from forming on top.
Trust me, that extra step makes a huge difference in keeping your hard work creamy and delicious for longer.
Do I Really Need an Ice Cream Maker?
Not at all! An ice cream maker is definitely the key to getting that classic, dense, and churned texture you find in a traditional custard-style ice cream. But it's far from the only way to make incredible frozen desserts at home.
The no-churn method is fantastic. By whipping heavy cream and folding in sweetened condensed milk, you can create an incredibly smooth, airy ice cream with just a mixer. You can also make amazing sorbets and granitas without any special equipment—just pour the mixture into a shallow pan and use a fork to scrape it every 30 minutes or so as it freezes.
And if you're looking to branch out from ice cream, you can find lots of more recipes and culinary ideas to try in the kitchen.
Ready to make your own amazing frozen desserts? The Cooler Kitchen electric ice cream maker makes it simple to whip up delicious ice cream, sorbet, and gelato right from your countertop. Find yours at https://www.coolerkitchen.com and get ready to become the most popular house on the block.