
The Best Way to Store Butter for Maximum Freshness
Deciding how to store butter really comes down to one simple question: how fast are you going to use it? If you want soft, spreadable butter for your morning toast, the countertop is perfect for a day or two. For keeping it fresh for a few weeks, the refrigerator is your best bet. And for stashing away those extra sticks you bought on sale, nothing beats the freezer.
Your Quick Guide to Perfect Butter Storage
Getting butter storage right is the key to keeping it creamy and delicious. Get it wrong, and you'll end up with a rancid, wasted stick. While most of us just toss butter in the fridge out of habit, both room-temperature and freezer storage have their own distinct advantages. The main goal is always the same: protect the butter from its biggest enemies—oxygen, light, and heat.
These three culprits are what cause butter to spoil and lose its delicate flavor. So, to make the right call, just think about when you'll be using it.
This little decision tree makes it super simple to figure out the best spot for your butter, whether it's for today's dinner rolls, next week's baking project, or a holiday recipe months down the road.

As you can see, if you need it soon, keep it on the counter. For anything longer than a couple of days, the fridge is the way to go. And for the long haul? The freezer is your friend.
Comparing Your Butter Storage Options
To really get a feel for how to handle butter, it helps to remember where it comes from. Like other high-quality dairy products, it's sensitive to its surroundings. But butter's high fat content gives it a unique advantage and a bit more flexibility than, say, milk or cream.
Let's break down the three main methods side-by-side to see how they stack up.
Butter Storage Methods at a Glance
This quick chart gives you an at-a-glance comparison of the three primary ways to store butter, so you can pick the perfect method for your needs.
| Storage Method | Best For | Typical Shelf Life | Ideal Temperature |
|---|---|---|---|
| Countertop | Daily use, soft & spreadable butter | 1-2 days (unsalted), up to 2 weeks (salted in a crock) | 68-72°F (20-22°C) |
| Refrigerator | Medium-term freshness, baking needs | 1-3 months (salted), 2 weeks (unsalted) | Below 40°F (4°C) |
| Freezer | Long-term preservation, bulk buying | 6-12 months | 0°F (-18°C) or below |
Each method has its place, from the convenience of the counter to the long-term security of the freezer.
Key Takeaway: Salt acts as a natural preservative, which is why salted butter holds up so much better at room temperature. If you're using unsalted butter, you should pretty much always keep it in the fridge unless you plan to use it within a day.
Keeping Butter Perfectly Spreadable on the Counter
For anyone who loves toast, the holy grail is soft, spreadable butter, ready to go whenever you are. Leaving butter on the counter might sound a little rebellious, but it’s a classic kitchen trick that works like a charm—if you do it right. This isn't just about convenience; it's about knowing a little food science.
The real star of this method is salted butter. Salt is a fantastic natural preservative that seriously slows down bacterial growth. Because butter is mostly fat with very little water, it’s already a tough place for microbes to thrive. Add salt to the mix, and you've got a recipe for success. That's why a stick of salted butter can safely hang out on your counter for up to two weeks, as long as your kitchen stays cooler than 72°F (22°C).
Unsalted butter, on the other hand, doesn't have that salty shield. It’s much more vulnerable to spoiling, so it’s best to only leave it out for a day or two.
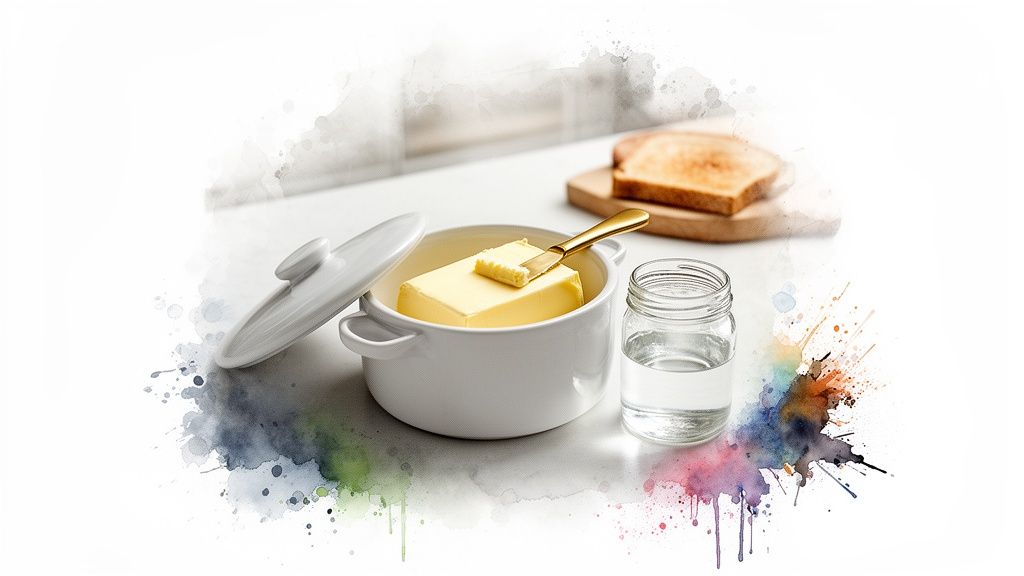
The Brilliant French Butter Dish
Just tossing a stick of butter on a plate and calling it a day isn't the best move. It leaves the butter exposed to air and light, which are the two main culprits that cause it to go rancid and lose its fresh, creamy flavor. To really nail countertop storage, you need the right gear: a French butter dish, also known as a butter crock.
This isn’t your average butter dish. It's a clever two-piece crock, first dreamed up in France in the late 19th century, that uses a simple water-seal to create an airtight home for your butter. This keeps oxygen out, preserving the butter's taste and freshness. If you're curious about the design, you can dive into the history of the French butter dish.
By using water to form an airtight seal, a French butter crock keeps butter soft, fresh, and ready to spread for up to a month, as long as the ambient temperature remains below 80°F (27°C).
The water doesn't just protect the butter; it also helps insulate it, keeping it at that perfect, easy-to-spread consistency.
How to Use a French Butter Dish
Getting started with a butter crock is simple, but a few key steps will guarantee you get the best results. Follow this routine, and you’ll have perfectly fresh, spreadable butter every time.
- Prep the Butter: Let one stick (1/2 cup) of butter soften up so it's easy to work with but not melted.
- Pack the Lid: Firmly press the softened butter into the bell-shaped lid. Make sure you get rid of any air pockets, which helps keep the butter from falling into the water later.
- Add Water to the Base: Pour about a half-inch of cool, fresh water into the bottom of the crock. Some people like to add a small pinch of salt to the water as an extra precaution.
- Seal It Up: Place the lid upside down into the base. The water will come up around the rim of the bell, creating that all-important airtight seal.
- Change the Water: This is the most important part! Swap out the water every 2-3 days. This keeps everything fresh and clean, preventing any chance of bacteria growing.
Once you get the hang of it, you’ll never go back to fighting with a cold, hard stick of butter again. It’s a small change that makes a big difference in your daily routine.
Mastering Refrigerator Storage for Medium-Term Freshness
When you have more butter than you can use in a few days, the refrigerator is your best friend. Stashing it in the cold is the ideal way to handle medium-term storage, keeping that extra stick fresh for next week’s baking project or morning toast. The chilly air puts the brakes on oxidation, preserving that pure, creamy flavor for weeks on end.
But the fridge isn't a flavor-proof vault. Butter, with its high-fat content, acts like a sponge for any strong smells floating around. Think garlic, last night’s curry, or that half-cut onion. This is why just tossing an unwrapped stick on a shelf is a terrible idea.
To keep your butter tasting like, well, butter, you need to protect it. The easiest way is to keep it in its original foil-lined paper. If it only came in parchment, you might want to add a layer of plastic wrap or pop it into an airtight container. The goal is simple: create a barrier that locks freshness in and keeps funky fridge odors out.
The Purpose of the Butter Compartment
You know that little covered shelf on your refrigerator door? That’s the butter compartment, and it was designed with a specific purpose in mind. It's actually the warmest spot in the whole fridge.
The slightly warmer temperature in the butter compartment keeps the butter from becoming rock-hard, making it easier to soften when you need it for spreading or baking.
Storing it there is a brilliant compromise, balancing long-term freshness with everyday usability. Of course, this only works if your fridge is set correctly. Maintaining the right safe food storage temperatures is the first step to keeping not just your butter, but all your groceries, in top condition.
Refrigerator Shelf Life Guidelines
How long your butter will last in the fridge comes down to one key ingredient: salt. Salt is a natural preservative, which means salted butter has a much longer runway than its unsalted cousin.
- Salted Butter: Stored correctly, it can stay fresh for a solid 1 to 3 months.
- Unsalted Butter: This one is on a much shorter clock. You'll want to use it within about 2 weeks to get the best, purest flavor for your recipes.
Tips for Using Cold Butter
The main drawback of chilling butter is that it turns into a brick—great for shelf life, not so great for spreading on soft bread. If you need to soften it quickly, here are a few tricks that won't turn it into a melted mess:
- Cut It Up: Chop the amount you need into small cubes. More surface area means it will soften up in about 15 minutes at room temperature.
- Grate It: Grab a cheese grater and shred the cold butter. The tiny shavings will be soft and recipe-ready in just a few minutes.
- Warm Glass Method: Run a glass under hot water, dry it, and place it over the butter for 5-10 minutes. The trapped heat gently softens it to perfection.
Protecting an ingredient's flavor is always the goal, whether it's butter or delicate herbs. You can find more tips on keeping kitchen staples at their peak in our guide to the best way to store fresh herbs.
Freezing Butter for Long-Term Preservation
The freezer is your best friend for long-term butter storage. Think of it as a time capsule for flavor. Whether you’ve stumbled upon a fantastic sale or want to savor a special artisanal butter, freezing hits the pause button, locking in that creamy texture and delicate taste for months. It is, without a doubt, the best way to store butter for the long haul.
So, how does it work? Freezing essentially stops the two biggest enemies of butter in their tracks: oxidation and moisture loss. When you drop the temperature down to 0°F (-18°C), you dramatically slow the chemical reactions that make fats go rancid. This deep freeze also prevents freezer burn, which is just a fancy term for ice crystals damaging the butter’s structure and leaving it with a dry, crumbly texture after thawing.
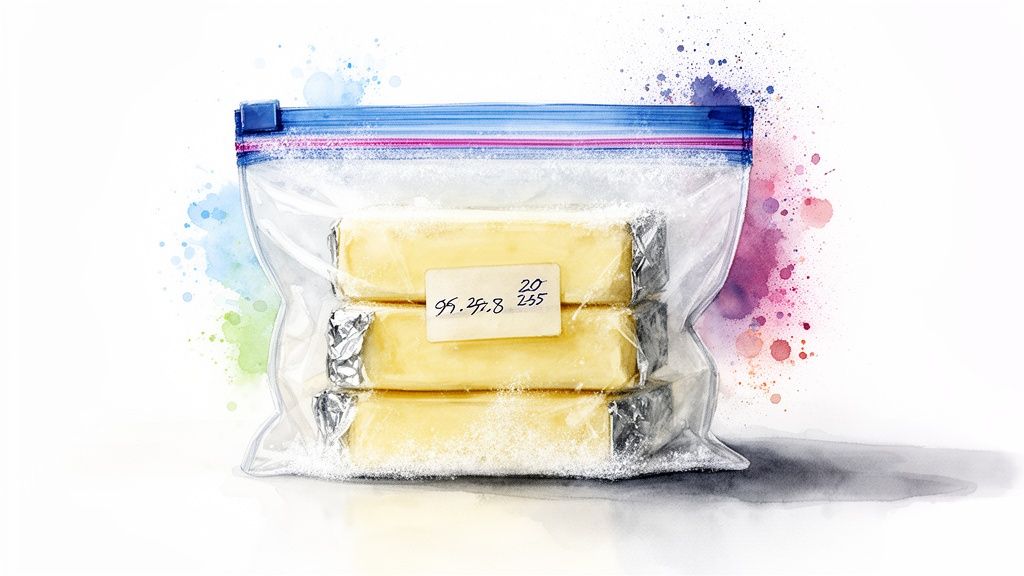
The Best Wrapping Technique for Freezing
Preparing your butter for its deep freeze is the most important step. Butter is mostly fat, and fat is like a sponge for smells. If it’s not wrapped well, your butter will start tasting like last night's leftover fish curry or that bag of frozen onions. A flimsy wrapper just won't cut it.
To build a proper fortress around your butter, here’s a tried-and-true double-wrapping method:
- Keep the Original Wrapper: Don’t toss the paper or foil it came in. This is your first line of defense.
- Add a Plastic Layer: Next, wrap the stick tightly in plastic wrap or seal it in a zip-top freezer bag. The key is to squeeze out as much air as you possibly can before you seal it shut.
- Finish with Foil: For the ultimate protection, wrap the whole thing in a sheet of aluminum foil. This adds another barrier against funky odors and freezer burn while also blocking out light.
- Label and Date: Grab a permanent marker and write the date on the outside. This little step saves you from future guesswork and helps you use up the oldest butter first.
This triple-layer technique is your guarantee that the butter will taste just as fresh as the day you bought it.
Safely Thawing Your Frozen Butter
When it's time to bring your butter out of hibernation, how you thaw it matters just as much as how you froze it. If you rush it, the texture can get weird, with the milk solids and butterfat separating into a greasy mess. A little patience goes a long way.
Freezing stands out as the top method for long-term butter preservation, keeping its taste and texture intact for up to a year. This makes it perfect for those who buy in bulk. While refrigeration is fine for a couple of weeks, butter is known to absorb 15-20% of flavors from nearby foods within just 48 hours. Discover more insights about how butter storage methods compare on OrganicValley.coop.
For the best, creamiest results, stick to one of these gentle methods:
- Overnight in the Refrigerator: This is the gold standard. Just move the wrapped butter from the freezer to the fridge and let it thaw slowly overnight.
- Countertop Thawing: In a bit of a hurry? You can leave it on the counter for a few hours. A full stick usually takes about 3-4 hours to soften at room temperature.
- Quick Softening Methods: If you need it right now, you can use the same tricks you’d use for cold butter from the fridge—grate it on a box grater or cut it into small cubes to speed things up.
Once you get the hang of freezing, you can stock up without worry, knowing you’ll always have perfect butter ready for any recipe you can dream up.
How to Choose the Right Butter Storage Container
The container you choose is just as important as where you decide to store your butter. Think of it as your butter’s first line of defense—a bodyguard protecting it from air, light, and any stray odors lurking in your kitchen. Picking the right one is key to making sure your butter stays fresh and delicious.
Your decision really comes down to balancing practicality with your own kitchen style. Whether you go for a classic ceramic dish for the countertop or a modern airtight tub for the freezer, each has its own perks. The ultimate goal is to find a container that masters the best way to store butter for your habits, whether that means keeping it perfectly spreadable or preserving a big batch for months.
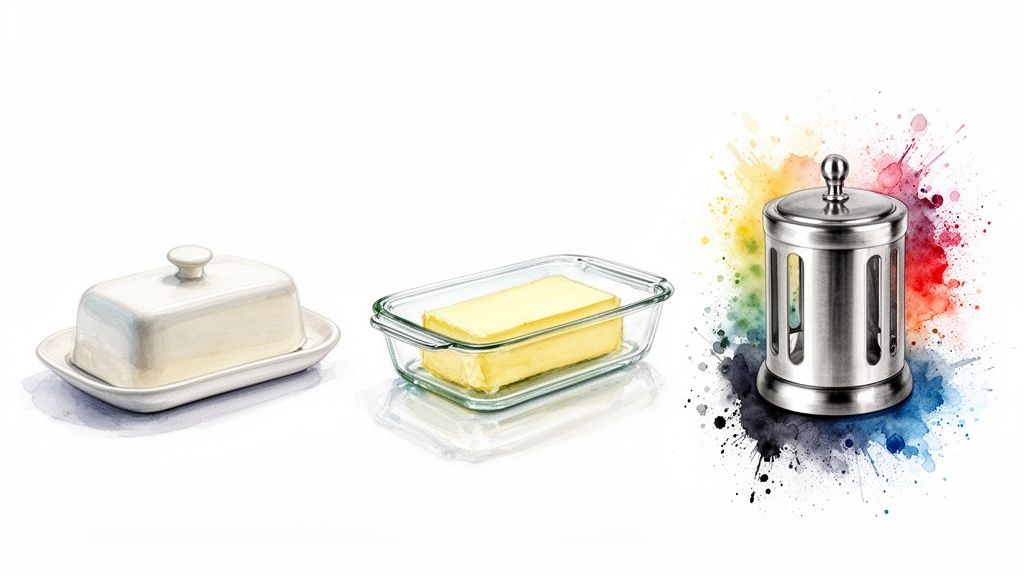
Butter Dishes for Countertop Use
If you love soft, ready-to-use butter, a good butter dish isn't just nice to have—it's essential. You might be surprised how much the material can affect how long your butter stays fresh on the counter.
- Ceramic and Porcelain: These are the traditional go-tos for a reason. They're fantastic at blocking out light and help insulate the butter from the little temperature swings that happen in a busy kitchen. Plus, they’re heavy, stable, and a breeze to clean.
- Glass: A glass dish is great because you can see exactly how much butter you have left at a glance. But that transparency has a downside: you have to be careful to keep it out of direct sunlight, which can cause the butter to spoil faster.
- Stainless Steel: Sleek and durable, stainless steel does a great job of blocking both light and odors. Just remember that metal conducts heat, so you'll want to keep it a safe distance from your stovetop or other warm spots.
For the true countertop connoisseur, the French butter crock (or butter keeper) is the gold standard. It uses a clever water-seal design to create an airtight environment, keeping butter perfectly soft and fresh for weeks without refrigeration.
Airtight Containers for the Fridge and Freezer
Once you move your butter into cold storage, the game changes. Your main enemies become funky fridge odors and dreaded freezer burn. This is where a truly airtight seal is non-negotiable.
For the refrigerator, a good airtight container beats leaving butter in its original paper wrapper, hands down. It forms a solid barrier against the powerful smells of garlic, onions, or last night's leftovers.
When it comes to the freezer, you need to be even more serious about protection. For maximum longevity, I always recommend double-wrapping the sticks—first in plastic, then in foil—before placing them in a freezer-safe, airtight container. Some products, like this modern bamboo butter dish with a lid, are stylish enough for the counter but also have a tight seal that works well for fridge storage.
The Surprising History of Keeping Butter Fresh
Long before refrigerators became a kitchen staple, keeping butter fresh was an art form born from sheer necessity. While we might worry about a stick of butter lasting a few weeks, our ancestors had to figure out how to make it last through entire seasons. Their ingenious solutions reveal a lot about the timeless principles we still rely on today.
Ancient cultures in Ireland and Scotland, for example, developed a fascinating technique: they buried massive lumps of butter in peat bogs. The cool, low-oxygen, and highly acidic environment acted as a perfect natural refrigerator, creating what’s now known as “bog butter.”
Amazingly, some of these discoveries date back to 400 B.C., with finds weighing nearly 100 pounds that have remained preserved for over 2,000 years.
Salt: The Original Preservative
Closer to home, 19th-century Americans turned to a different preservative: salt. Families would pack freshly churned butter into ceramic crocks, layering it with heavy doses of salt—sometimes 10 times more than we'd ever use in our saltiest butter today. You can dive deeper into these fascinating techniques and explore butter’s rich history on honokage.com.
These historical solutions all point to two core principles of modern butter storage: protect it from air and keep it cool. The bogs provided an airtight, cold environment, while the salt created a powerful barrier against spoilage.
From buried treasure to salt-packed crocks, the quest for perfectly fresh butter is clearly nothing new.
Common Butter Storage Questions Answered
Even when you think you’ve got your butter storage down, a few tricky questions always seem to pop up. Nailing these little details is the key to making sure your butter is perfect for everything, from slathering on morning toast to preserving a big batch for holiday baking.
Let’s solve a few of the most common butter mysteries once and for all.
Storing Unsalted Butter on the Counter
We know salted butter is perfectly happy in a butter dish on the counter for a week or so, but what about its unsalted cousin? It’s a completely different situation.
Salt is a fantastic natural preservative. Without it, unsalted butter is much more susceptible to spoilage. For that reason, I never recommend leaving unsalted butter out at room temperature for more than a day or two, tops. Any longer, and you're just inviting off-flavors and rancidity.
Signs of Spoiled Butter
So, how do you know if your butter has turned? Your senses are your best guide. Bad butter gives off some pretty obvious clues that are hard to ignore.
- Smell: It will have a sour or stale odor, sometimes reminiscent of old crayons or wet cardboard.
- Appearance: The color might look off, often darker or uneven. You might also notice a translucent, oily layer on the outside that’s lighter than the inside.
- Taste: The flavor is the biggest giveaway—it will be unpleasantly soapy, bitter, or just plain foul.
If you notice any of these signs, it's time to toss it. Spoiled butter will absolutely ruin the flavor of any dish. Plus, it's a sign the fats have oxidized, contributing to food waste. Knowing how to store food right is the first step, and you can learn more about how to reduce food waste at home in our complete guide.
Refreezing Thawed Butter
It can be tempting to pop that extra stick of thawed butter back into the freezer, but trust me, it’s not a good idea. Refreezing messes with butter's delicate emulsion—the carefully balanced structure of fat and water.
When you thaw it for a second time, you'll likely end up with a grainy, greasy texture that just isn't pleasant to work with. It's best to avoid it.
Whipped Butter Storage Rules
Finally, let's talk about whipped butter. This one has its own set of rules. Because it’s been aerated and often contains extra water or other ingredients, it’s far more perishable than a solid stick of butter.
There’s no debate here: whipped butter must always be stored in the refrigerator to stay fresh and safe to eat.
At Cooler Kitchen, we believe beautiful, practical kitchenware makes cooking simpler and more joyful. From our sleek butter dishes to smart storage solutions, we design tools that help you make the most of every ingredient. Find your new favorite kitchen essential at https://www.coolerkitchen.com.